Proxmox
Integrating Proxmox Virtual Environment (VE) with vScope provides a detailed inventory of your virtual infrastructure, collecting data on hosts, virtual machines, containers, storage and networking.
Connecting vScope to Proxmox
Section titled “Connecting vScope to Proxmox”Step 1: Create a User for vScope in Proxmox
Section titled “Step 1: Create a User for vScope in Proxmox”- Log in to the Proxmox VE web interface.
- Navigate to Datacenter → Permissions → Users and click Add.
- Enter a User name like
vscopeand select your preferred Realm (e.g.,PAM). - Set a strong password.
- Click Add.
Step 2: Grant Read-Only Permissions
Section titled “Step 2: Grant Read-Only Permissions”- Navigate to Datacenter → Permissions and click Add → User Permission.
- Set Path to
/, select thevscopeuser, and choose thePVEAuditorRole. - Ensure Propagate is checked and click Add.
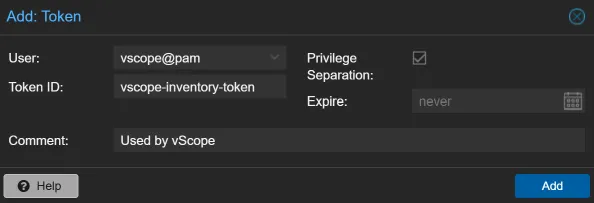
Step 3: Create an API Token
Section titled “Step 3: Create an API Token”- Navigate to Datacenter > Permissions > API Tokens and click Add.
- Select the
vscope@pamUser and give the token a Token ID (e.g.,vscope-inventory-token). - Ensure Privilege Separation is checked and click Add.
- Important: Copy the Token ID and Secret. You’ll need these when adding your credential in vScope.

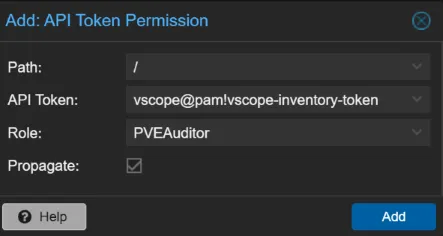
Step 4: Assign Permissions to the API Token
Section titled “Step 4: Assign Permissions to the API Token”- Go to Permissions, click Add > API Token Permission.
- Set the Path to
/, select your new token, and assign thePVEAuditorRole. - Make sure Propagate is checked and click Add.
Step 5: Add the Proxmox Credential to vScope
Section titled “Step 5: Add the Proxmox Credential to vScope”- In vScope, navigate to Discovery > Credentials and click Create Credential.
- Select Proxmox.
- Enter your Proxmox server URL (e.g.,
https://proxmox-server:8006). - In the Authorization Header field, enter
PVEAPIToken=followed by your token ID and secret. It should look like this:PVEAPIToken=vscope@pam!vscope-inventory-token=your-secret-value. - Toggle on
Accept all server certificatesonly if the Proxmox server uses a self-signed certificate. - Click Test Credential to verify, then Save.
Troubleshooting
Section titled “Troubleshooting”Missing data in vScope?
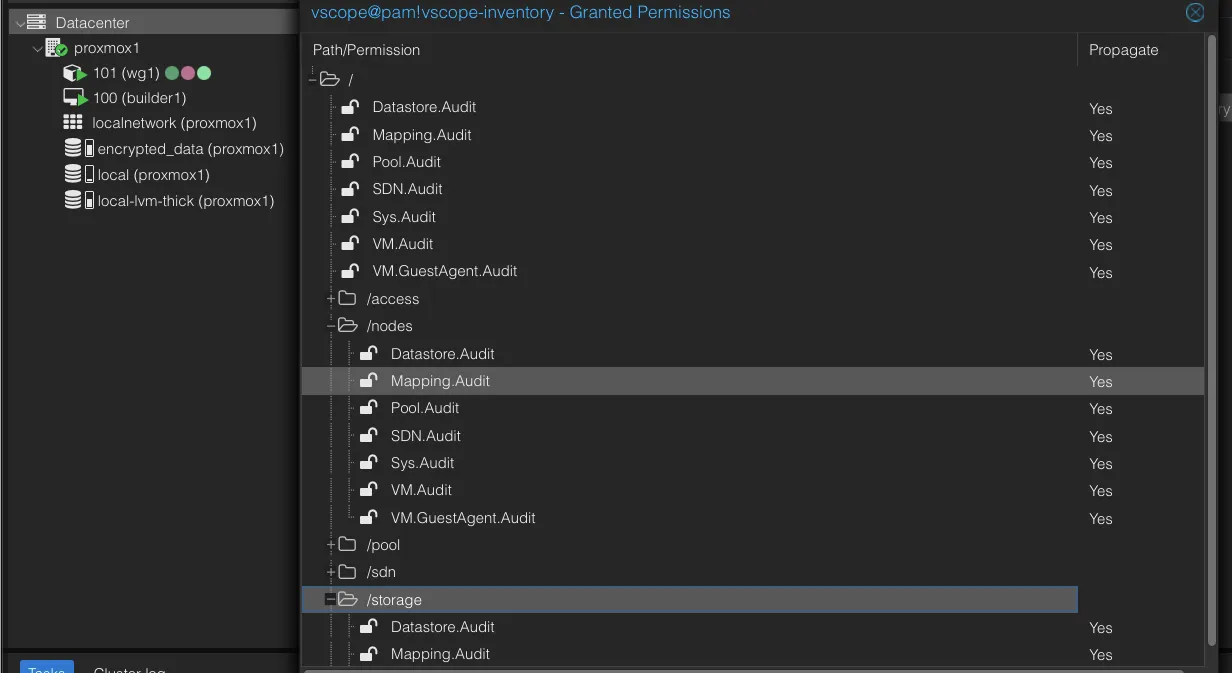
Section titled “Missing data in vScope?”Insufficiant permissions on either the user or the token can lead to discovery failure or missing data. The log output might show this error message:
Failed to get data from /api2/json/nodes/proxmox1/status: Unsuccessful response with status code:403and body: {"data":null,"message":"Permission check failed (/nodes/prox,ox1, Sys.Audit)\n"}Make sure you have granted read access, i.e. Sys.Audit permissions, to all enpoints. The permissions page (Datacenter > Permissions > Users/Api Tokens ) should look similar to this:
Connection reset
Section titled “Connection reset”Another reason for discovery failure could be that the connection timed out and closed, possibily caused by a firewall blocking the communication.
- From the vScope machine, open a browser and go to
https://proxmox-server:8006/api2/json/version. - Expect an
HTTP 401response because no authentication is provided. This confirms the API is reachable. - If there is no response, open a shell on the Proxmox server and run:
curl -vk https://127.0.0.1:8006/api2/json/versionYou should see output similar to:
* Connected to 127.0.0.1 (127.0.0.1) port 8006* using HTTP/1.x> GET /api2/json/version HTTP/1.1> Host: 127.0.0.1:8006- If there is no response locally, confirm the API services are running:
systemctl status pveproxy --no-pagersystemctl status pvedaemon --no-pagerIf the API is reachable locally on the Proxmox server but not from vScope, a firewall or network policy is likely blocking access to port 8006/TCP.
Guest OS information or IP addresses are missing
Section titled “Guest OS information or IP addresses are missing”Make sure that the QEMU Guest Agent is installed, running, and enabled on your virtual machines.