Adding Microsoft Entra ID as IdP (SAML 2.0)
vScope supports Single Sign-On (SSO) using any SAML2.0 capable IdP. This allows enhanced security features, such as Multi-factor Authentication (MFA). By using a SAML2.0 capable IdP to handle authentication and permission settings for vScope users, you can centralize access control and user management. This guide outlines the configuration steps.
Microsoft Entra ID
Section titled “Microsoft Entra ID”The following example configures SSO via SAML2.0 in Microsoft Entra ID. SAML2.0 support in vScope is generic and it should be possible to configure any SAML2.0 capable IdP to work with vScope.
Requirements
Section titled “Requirements”- Ensure you have permissions in Microsoft Entra ID to manage Enterprise Applications.
- Confirm that vScope is installed in your data center and has remote access to Azure.
- Make sure an HTTPS certificate has been uploaded and saved in vScope.
- Ensure that the accounts have an registered email (same as user principal name) in Microsoft Entra ID, otherwise they will not be allowed to log in using SSO.
- Currently, only Single-tenant SSO is supported.
Creating an Enterprise Application
Section titled “Creating an Enterprise Application”First, create an Enterprise Application and configure permissions to allow vScope to read user and group data from Microsoft Entra ID.
-
Log in to Microsoft Entra ID at https://portal.azure.com/.
-
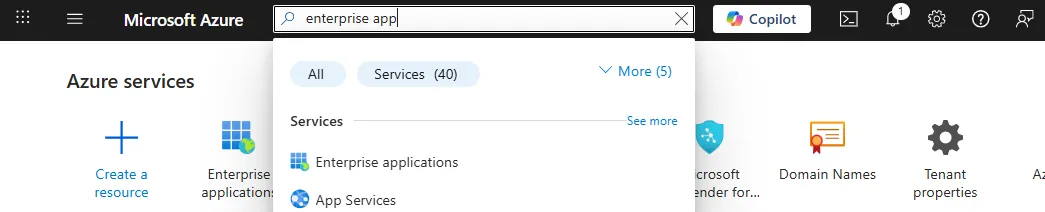
In the search bar, enter “enterprise applications” to locate Enterprise Applications
-
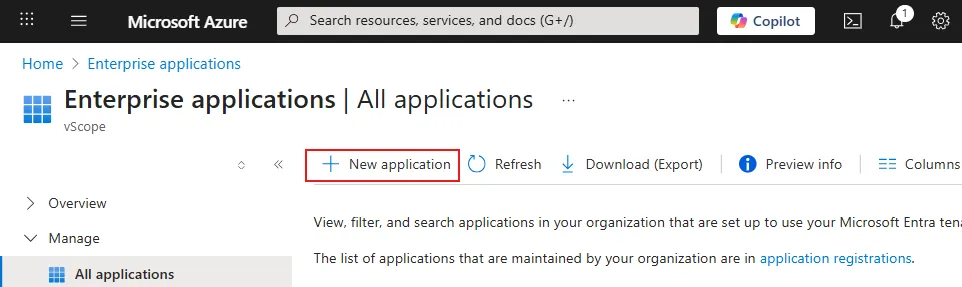
Click + New application to create a new Enterprise Application.
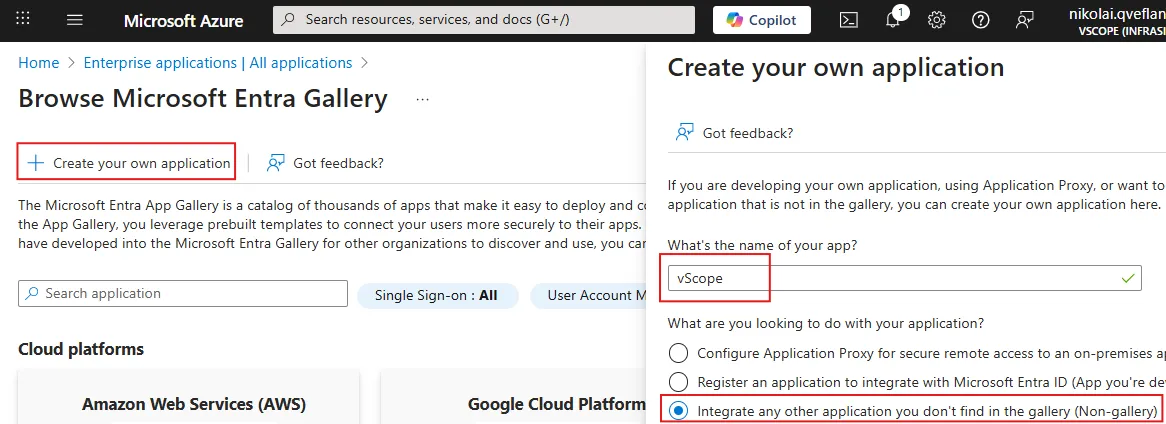
- Click + Create your own application.
- Enter the name of the app under What’s the name of your app.
- Under What are you looking to do with your app? select Integrate any other app you don’t find in the gallery (Non-gallery) and click Create.
User Assignment
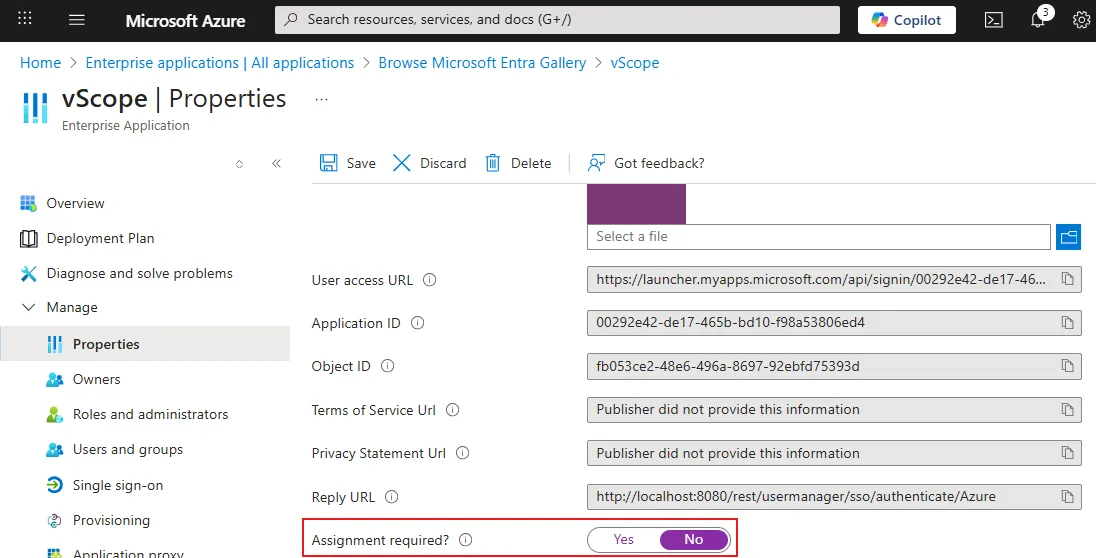
Section titled “User Assignment”User assignment is used to control which users can access the app. If you want only specific users to be able to authenticate to vScope then you must enable Manage > Properties > Assignment required and assign users under Manage > Users and groups.
If Assignment required is not enabled then all users will be able to authenticate to vScope.
Configure Single Sign-On
Section titled “Configure Single Sign-On”To configure SAML authentication to vScope we must complete the following steps.
-
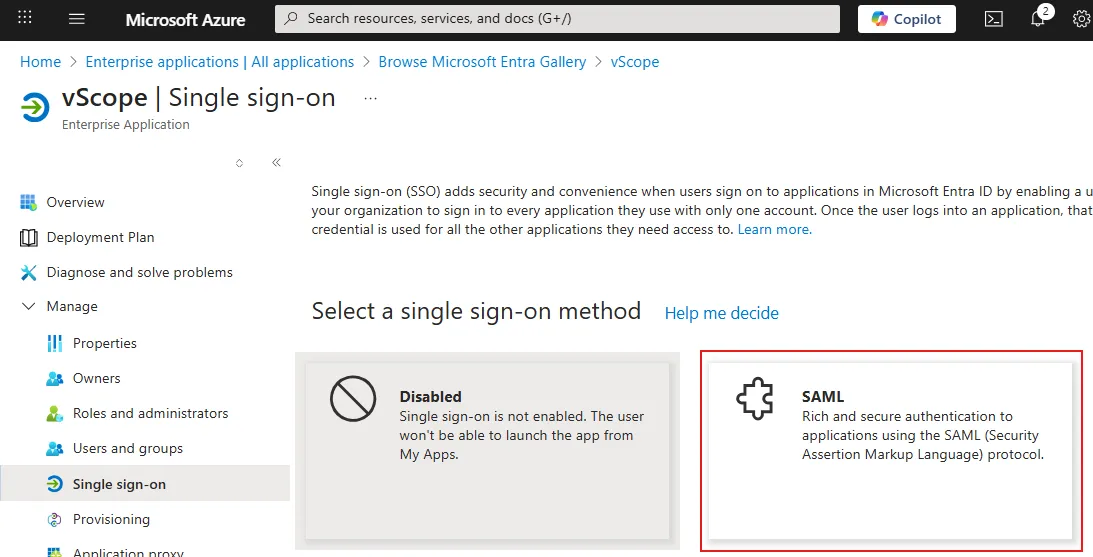
In Azure, select Manage > Single sign-on and under Select a single sign-on method, select SAML.
-
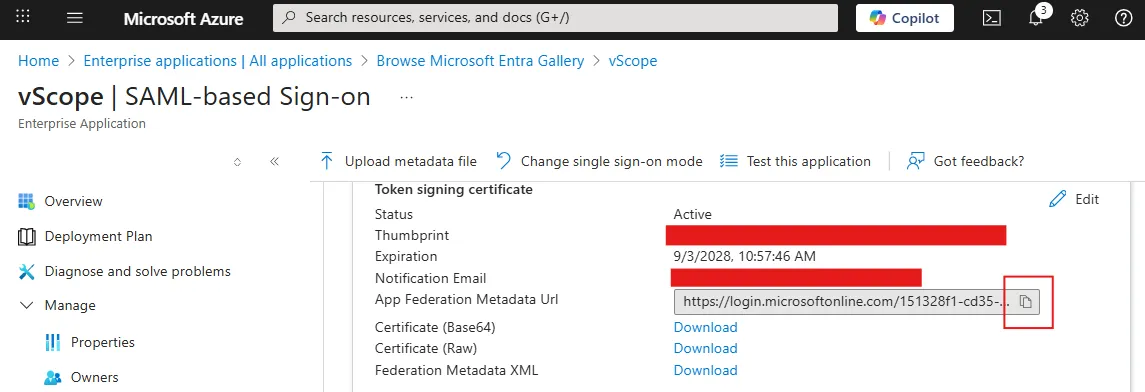
Copy the value of Manage > Single sign-on > SAML Certificates > App Federation Metadata Url.
-
Open vScope Single Sign-On Settings.
- Paste the value into App Federation Metadata Url.
- Enter vScope into Identifier (Entity ID).
- Enter Azure into Configuration name.
- Click Save to generate the callback URL needed to complete the configuration.
-
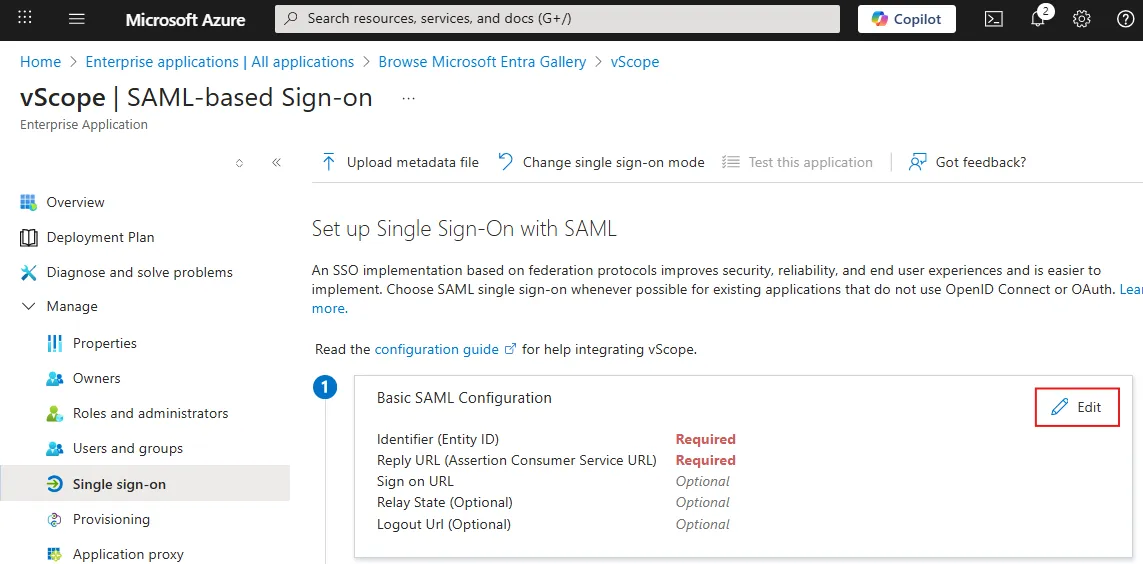
In Azure, under Manage > Single sign-on > Basic SAML Configuration, click Edit.
-
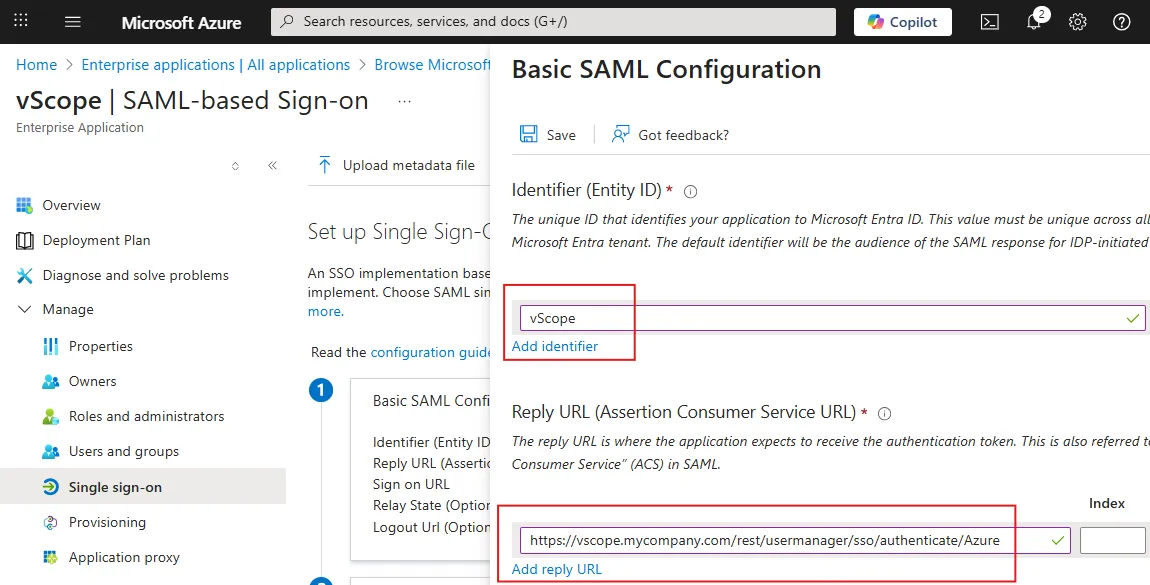
Ensure that the value in Identifier (Entity ID) matches the value of Identifier (Entity ID) in vScope SSO settings.
-
Ensure that the value in Reply URL (Assertion Consumer Service URL) matches the value of Callback URL in vScope SSO settings.
-
Click Save.
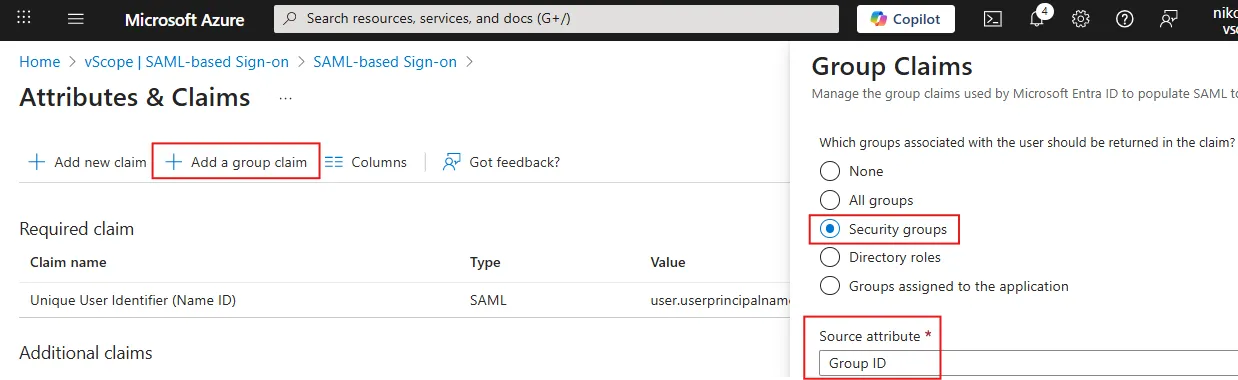
Add groups attribute claim
Section titled “Add groups attribute claim”Group mapping in vScope uses the groups attribute from the SAML user profile to map groups from the identity provider to groups in vScope. To ensure that the groups attribute is present in the SAML user profile, follow these steps.
-
In Azure, under Manage > Single sign-on > Attributes & Claims, click Edit.
-
Click + Add group claim.
-
Select Security Groups or the relevant group type for your setup.
-
Under Source attribute, select Group ID or the relevant attribute for your group mapping.
-
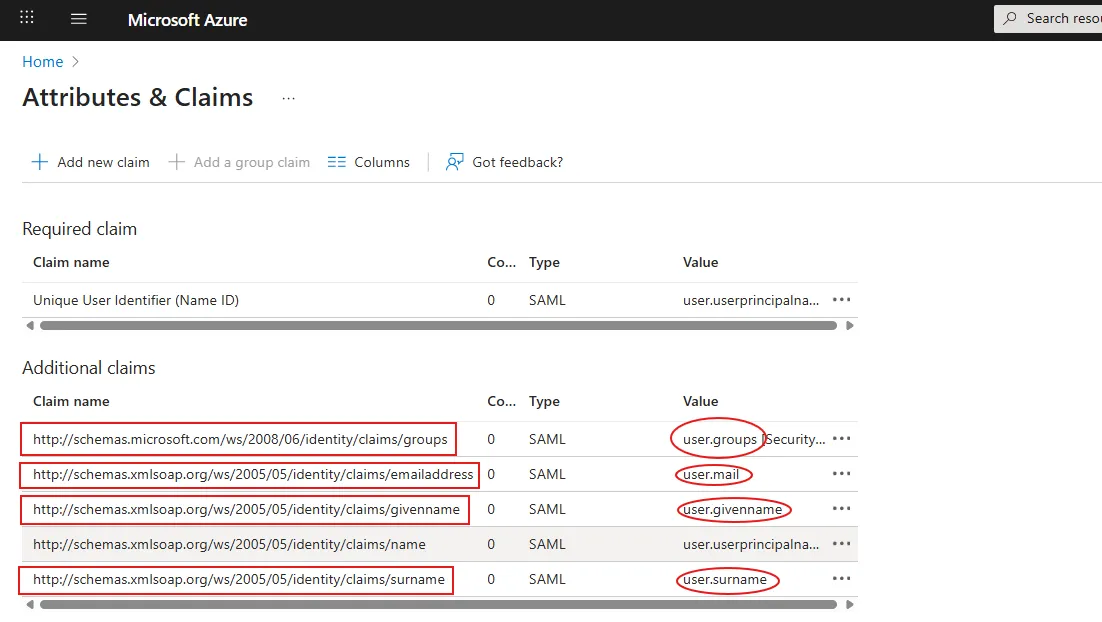
Attributes & Claims should now contain givenname, surname, emailaddress, name and groups.
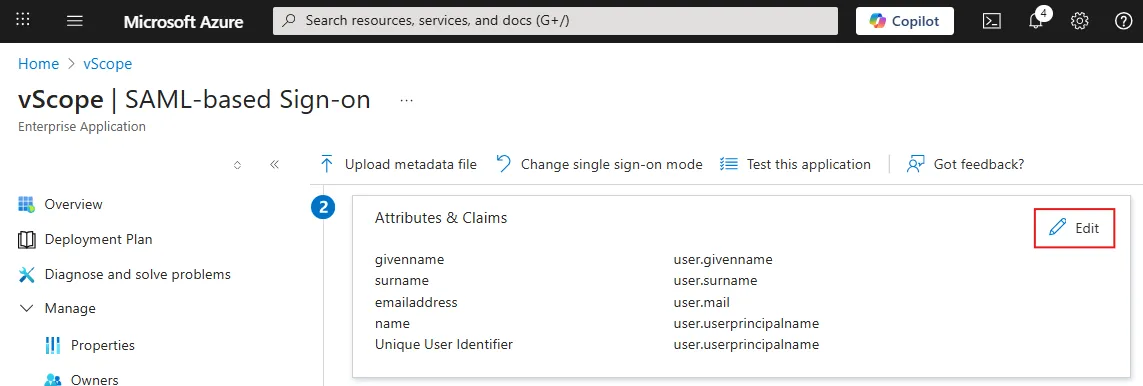
Configure attribute statements
Section titled “Configure attribute statements”The Attribute statements in vScope Single Sign-On settings determines how attributes/claims from the SAML user profile are mapped to attributes that vScope needs for authentication and authorization of users.
-
In Azure, under Manage > Single sign-on > Attributes & Claims, click Edit.
-
For each of the highlighted claims under Additional claims, take note of the value in the column Claim name and Value.
-
Open vScope Single Sign-On settings.
-
Under Attribute statements:
-
Edit Email and enter the value from the Claim name column in Azure where the value of column Value in Azure contains user.mail.
-
Edit Given name and enter the value from the Claim name column in Azure where the value of column Value in Azure contains user.givenname.
-
Edit Surname and enter the value from the Claim name column in Azure where the value of column Value in Azure contains user.surname.
If group attribute claim was added in the previous step:
- Edit Groups and enter the value from the Claim name column in Azure where the value of column Value in Azure contains user.groups.
Save the vScope Single Sign-On settings.
Configuring vScope group mapping
Section titled “Configuring vScope group mapping”- In vScope, under Settings > SSO select Enable Group mapping
- Select Property in Azure: Choose the Azure property (e.g., group ID) to base your mapping on.
- Name the Mapping: Enter a name for your mapping to help you identify it in vScope, e.g. Service Desk
- Enter Azure Object ID: Provide the object ID of the user/group in Azure. You can find the group ID in Azure.
- Preview and Add Mapping: Review your mapping settings, then click Add.
Group mapping will apply upon next user log in.
Troubleshooting
Section titled “Troubleshooting”Wrong username, password or authentication method.
Section titled “Wrong username, password or authentication method.”This is a generic error that can relate to anything from configuration to permissions.
- If the user exists in vScope:
- Ensure that you have set Authentication to SSO.
- If the user does not exist in vScope:
- Ensure that the accounts have a registered email (same as user principal name) in Microsoft Entra ID.
- Ensure that the user account is in the correct tenant in Microsoft Entra ID
- Ensure that the accounts have permissions to log in to vScope (e.g. via Group Mapping) or that it has a registered email in Microsoft Entra ID.
Group Mapping not working
Section titled “Group Mapping not working”- Learn more at SSO Group Mapping not working
Important notes
Section titled “Important notes”Changes in the IdP are not immediately reflected in vScope
Section titled “Changes in the IdP are not immediately reflected in vScope”SAML 2.0 does not provide a mechanism to dynamically request an updated user profile from the IdP. vScope only receives the user profile from the IdP at the time of authentication.
A user is required to re-authenticate to vScope once their session has expired. Session timeout settings can be configured in Users & Access > Users > Session Timeout Time in vScope.
If dynamically updated user profiles are important, consider using OpenID Connect for SSO instead of SAML 2.0. With OpenID Connect, user profiles are typically refreshed every hour.