Adding Microsoft Entra ID as IdP (Open Id Connect)
Configuring Single Sign-On (SSO) with Microsoft Entra ID as an identity provider (IDP) for vScope allows enhanced security features, such as Multi-factor Authentication (MFA). By using Microsoft Entra ID to handle authentication and permission settings for vScope users, you can centralize access control and user management. This guide outlines the configuration steps.
Requirements
Section titled “Requirements”- Ensure you have permissions in Microsoft Entra ID to manage App Registrations.
- Confirm that vScope is installed in your data center and has remote access to Azure.
- Make sure an HTTPS certificate has been uploaded and saved in vScope.
- Ensure that the accounts have an registered email (same as user principal name) in Microsoft Entra ID, otherwise they will not be allowed to login using SSO.
- Currently, only Single-tenant SSO is supported.
Authentication
Section titled “Authentication”Creating an App Registration in Microsoft Entra ID
Section titled “Creating an App Registration in Microsoft Entra ID”First, create an App Registration and configure permissions to allow vScope to read user and group data from Microsoft Entra ID.
-
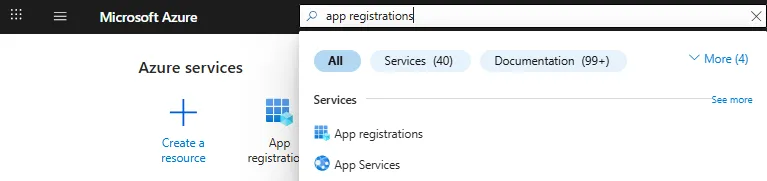
Log in to Microsoft Entra ID at https://portal.azure.com/.
-
In the search bar, enter “app registrations” to locate App Registrations
-
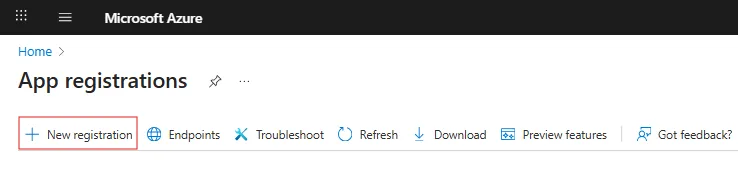
Click + New registration to create a new App Registration.
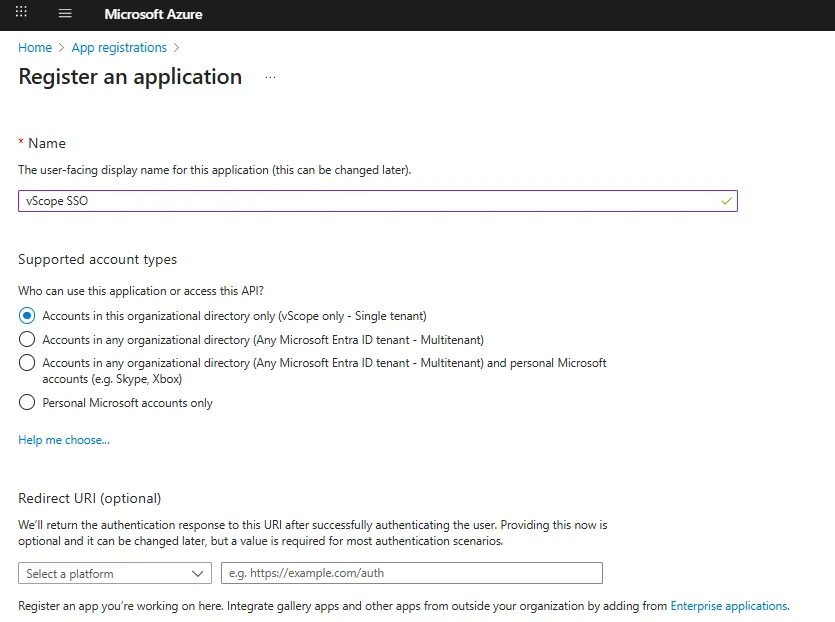
- Enter a name, such as vScope SSO.
- Under Supported account types, select Accounts in this organizational directory only (Single tenant).
- Leave Redirect URI (optional) empty and click Register.
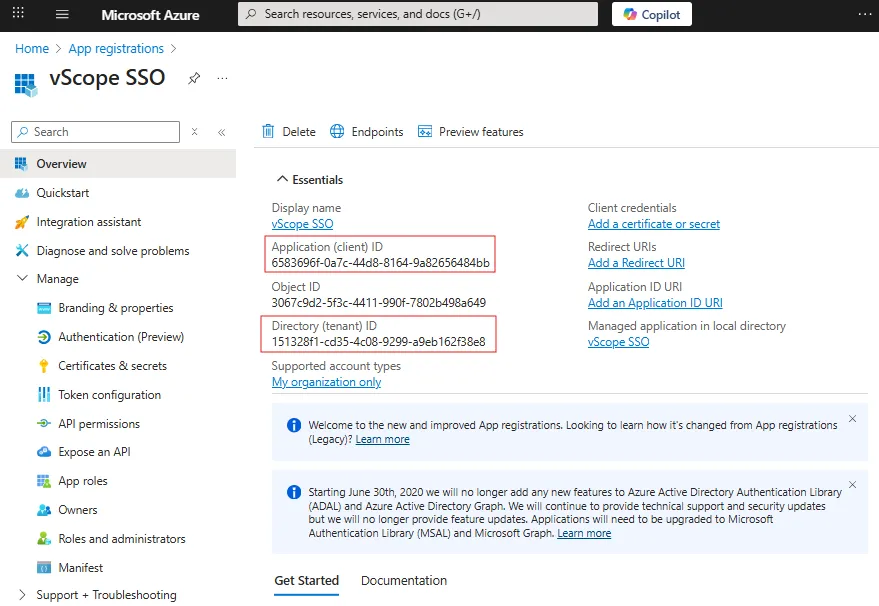
- Copy and save the Application (client) ID and Directory (tenant) ID. These will be required later to connect vScope to Microsoft Entra ID.
Generating a client secret for the App Registration
Section titled “Generating a client secret for the App Registration”This client secret allows vScope to securely connect with Microsoft Entra ID.
-
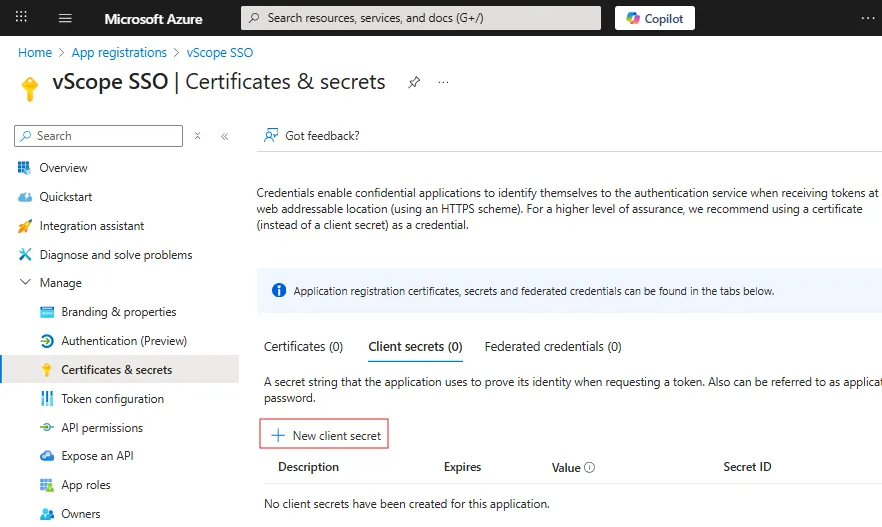
In your app registration, navigate to Manage > Certificates & secrets.
-
Click + New client secret and provide a description (e.g., “Used for vScope SSO”).
-
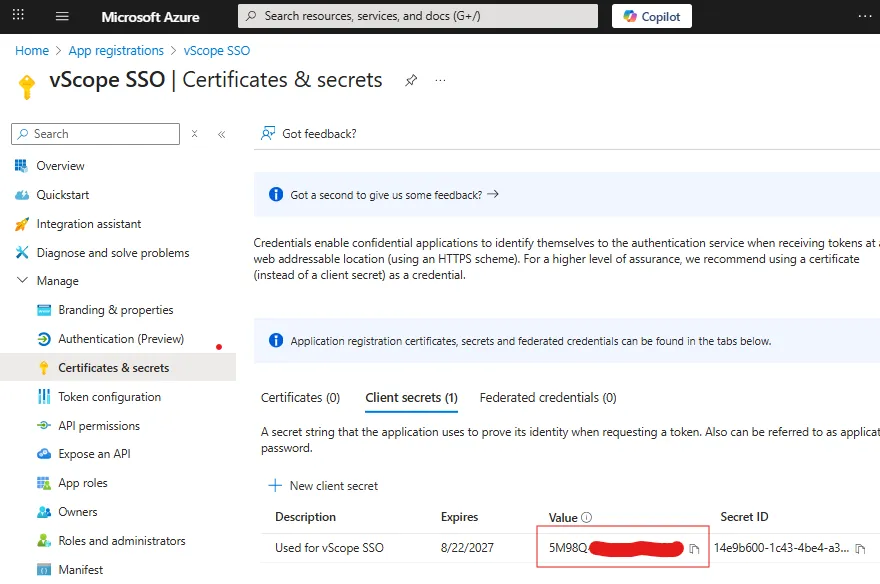
Set an expiration for the secret key. Once it expires, you will need to generate a new key.
-
Click Add
-
Important: Immediately copy and save the Value. This client secret is only visible upon creation.
Granting Permissions to the App Registration
Section titled “Granting Permissions to the App Registration”Grant the necessary permissions for the app registration to read data from Microsoft Entra ID.
-
In the app registration, go to Manage > API permissions. The permission User.Read is already added.
-
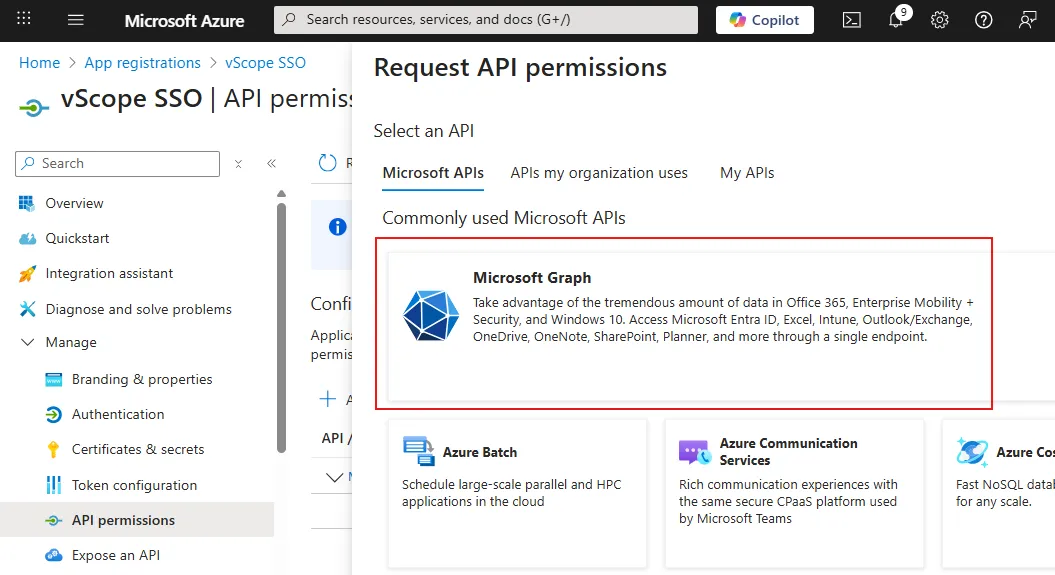
Click + Add a permission.

-
Select Microsoft Graph
-
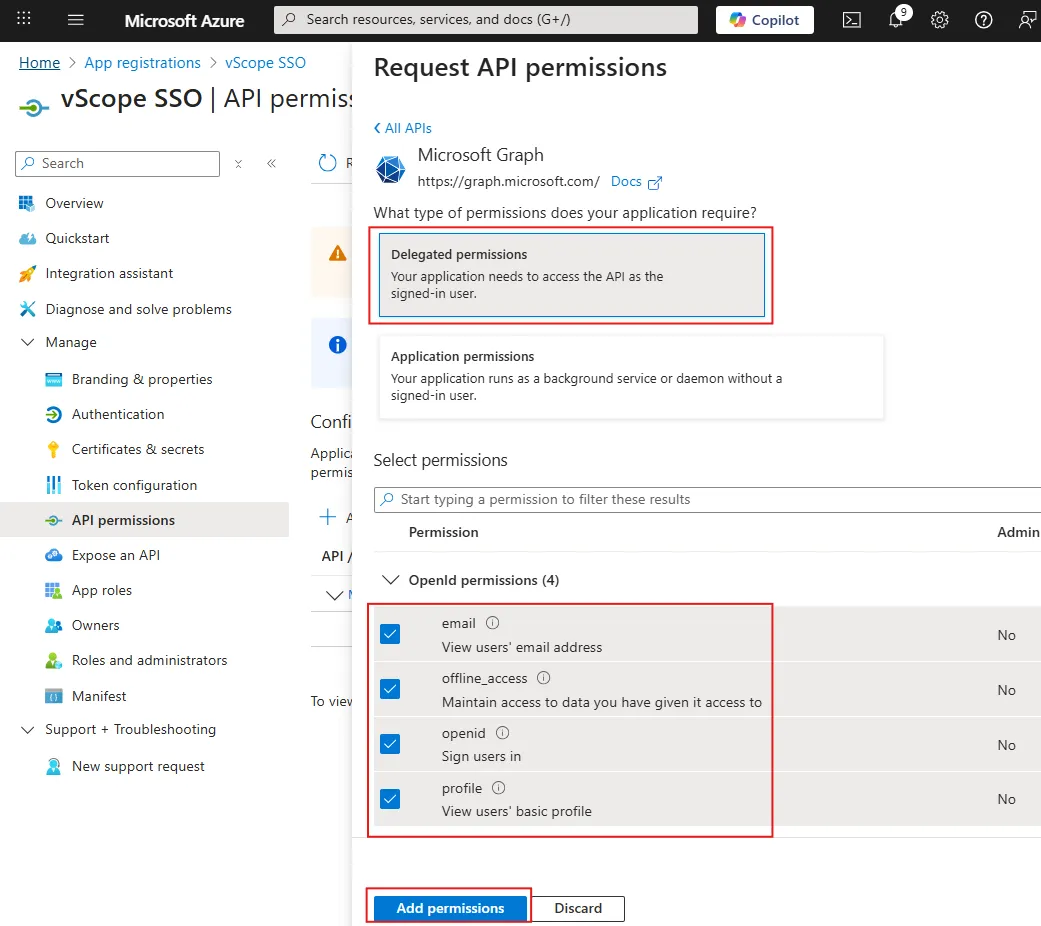
Select Delegated permissions.
-
Scroll down to OpenId permissions.
-
Select email, offline_access, openid and profile permissions and click Add permissions.
-
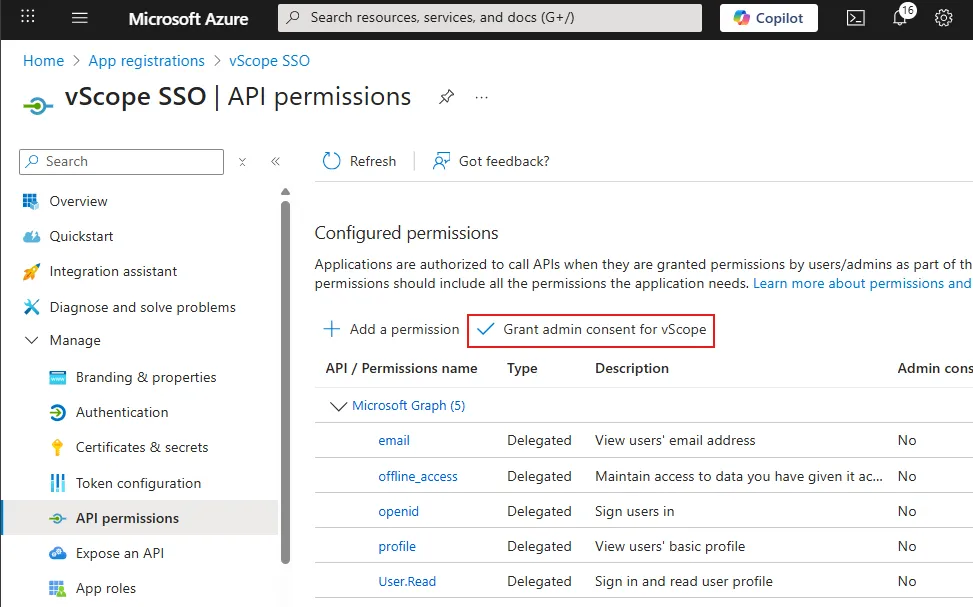
You should now have five permissions listed under Manage > API permissions: email, offline_access, openid, profile and User.Read.
-
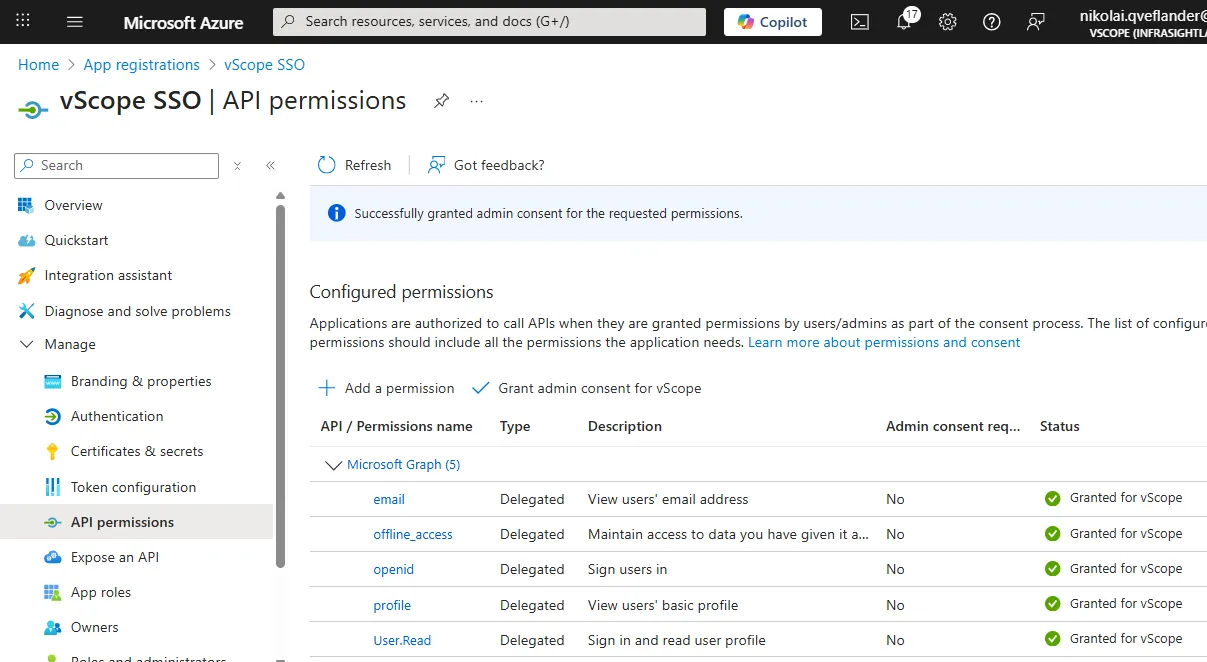
Click Grant admin consent for vScope and then Yes to confirm.
-
Each permission should now read Granted for vScope in the Status column.
-
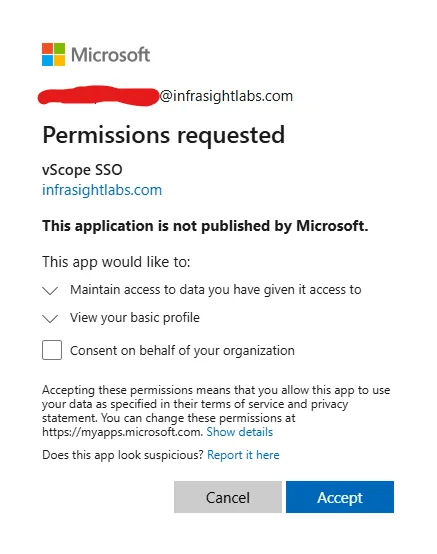
Important: If admin consent is not granted for atleast openid and offline_access then users will be asked to accept requested permissions during the vScope login phase. It is highly recommended that admin consent is granted.
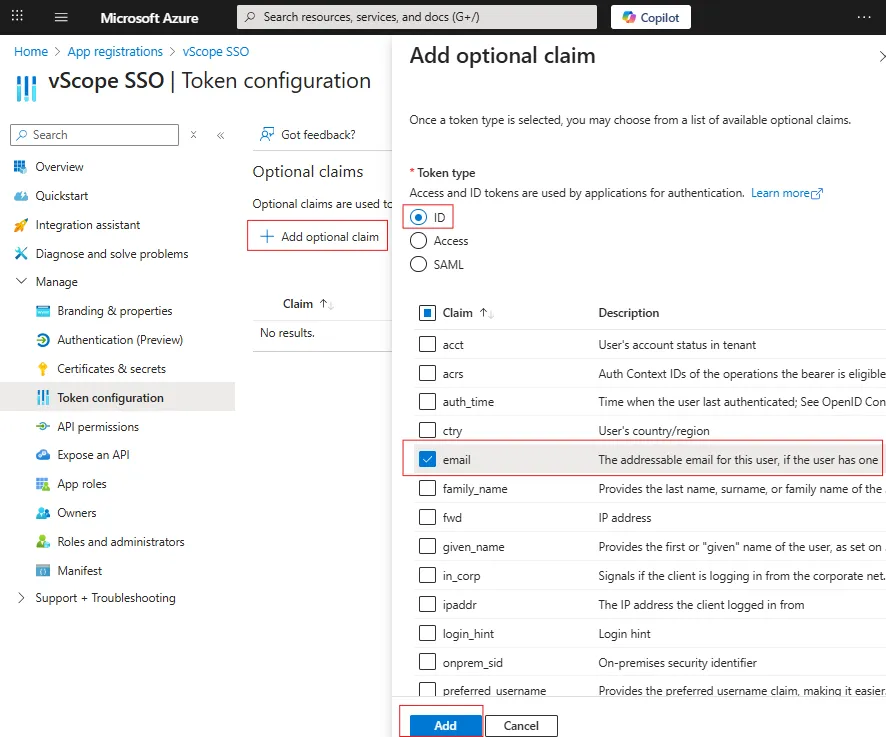
To allow vScope to use email as an identifier, we must add email to the claims returned from Microsoft Entra ID.
-
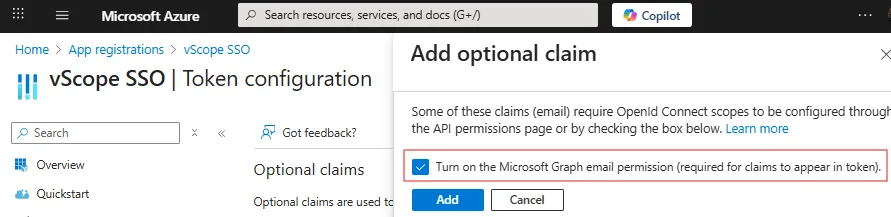
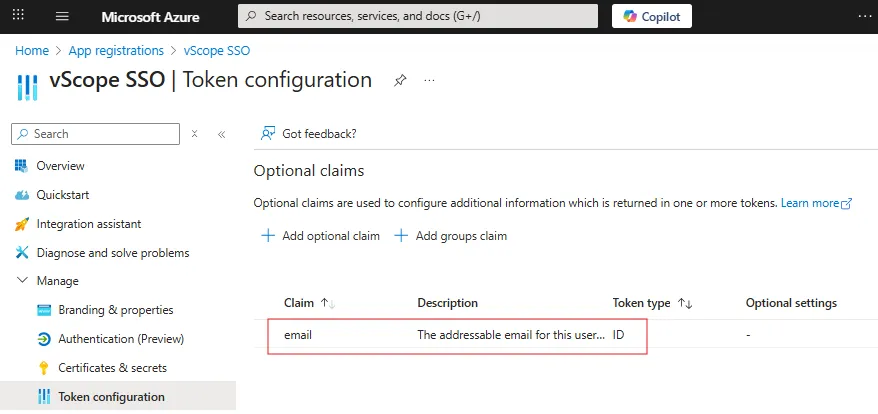
Go to Manage > Token Configuration and click + Add Optional Claim.
-
Set Token type to ID, select email as the claim. Click Add.
-
Important: Enable Microsoft Graph email permission by selecting Turn on Microsoft Graph email permission if prompted to when adding the claim. An email address must be set on user accounts in Microsoft Entra ID for them to be able to login.
-
You should now see email under Manage > Token configuration > Optional Claims.
-
Ensure that email is also listed under Manage > API permissions.
Configuring SSO in vScope
Section titled “Configuring SSO in vScope”In this step, enter the values from Microsoft Entra ID into vScope to complete the SSO configuration.
-
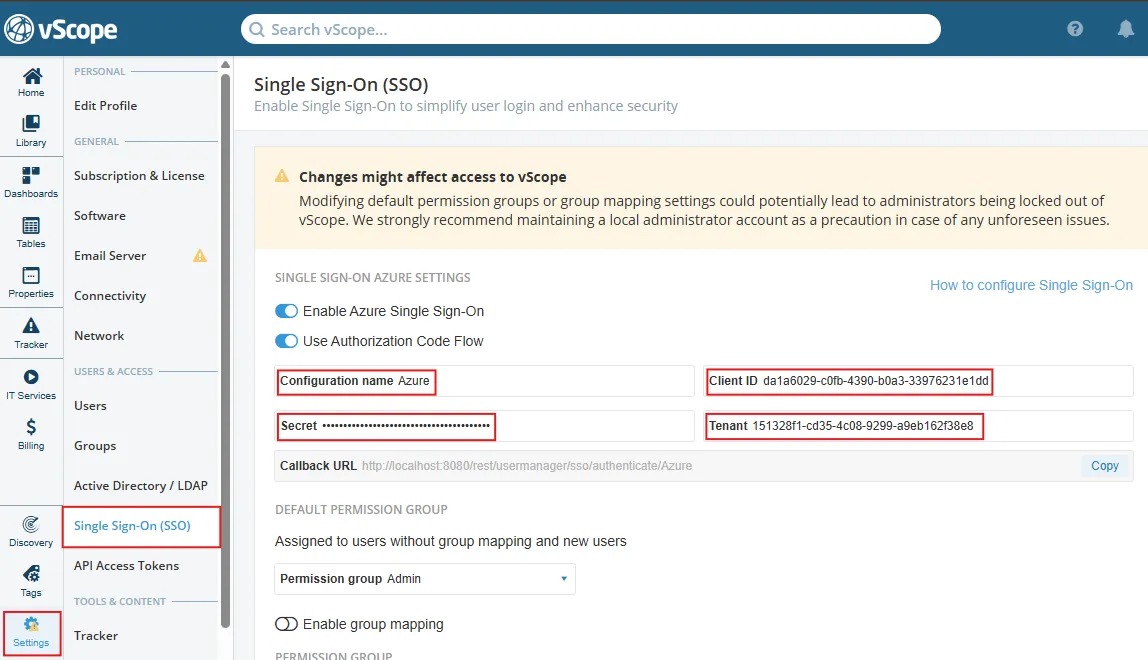
In vScope, navigate to Settings > Users & Access > Single Sign-On and enable Microsoft Entra ID Single Sign-On.
-
Set a configuration name, such as AzureSSO. (Use only letters and digits; this name will be used in the callback URL.)
-
Paste the ClientID (from the Application (client) ID).
-
Paste the TenantID (from the Directory (tenant) ID).
-
Paste the Secret (from the client secret Value).
-
Ensure that Authorization Code Flow is checked.
-
Save the settings to generate a Callback URL for the final step in Microsoft Entra ID.
Configuring Authentication for the App Registration
Section titled “Configuring Authentication for the App Registration”This step configures the callback URL in Microsoft Entra ID to enable authentication.
-
In the app registration, go to Manage > Authentication.
-
Under the Redirect URI configuration tab, click Add Redirect URI
- Select Web
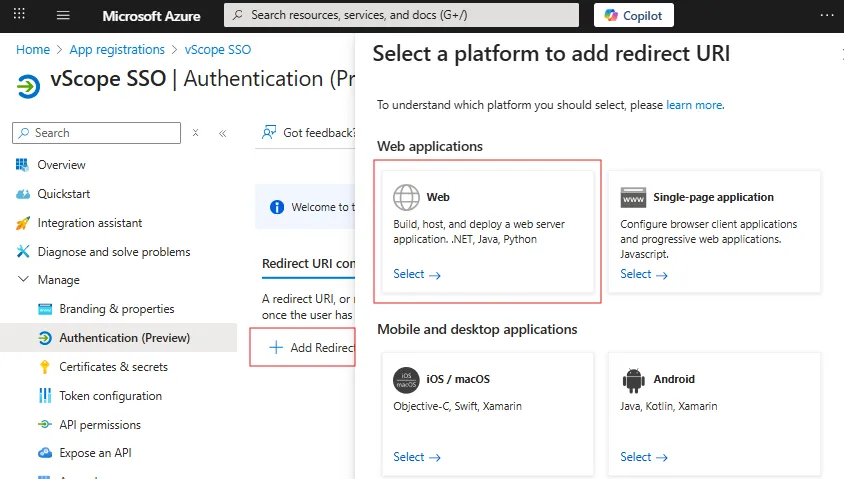
- Paste the Callback URL from vScope into Redirect URI
- Leave Front-channel logout URL empty.
- Leave both ID tokens and Access tokens unchecked for Implicit grant and hybrid flows.
- Click Configure

Upon completion, vScope is now configured to use Microsoft Entra ID for SSO.
Automated set up with PowerShell
Section titled “Automated set up with PowerShell”This script automates the creation and configuration Single Sign-On (SSO) with Microsoft Entra ID as an identity provider (IDP) for vScope allows enhanced security features, such as Multi-factor Authentication (MFA).
Requirements:
-
PowerShell 7+
-
Global Admin / Privileged Role Admin / Cloud App Admin
-
Modules:
Install-Module Microsoft.Graph -Scope CurrentUserInstall-Module Az.Accounts,Az.Resources -Scope CurrentUser # only if using RBAC auto-assign
Step-by-step instructions:
- Make sure you have an account with the Global Administrator role in Microsoft Entra ID.
- Open PowerShell on your computer.
- Install the required modules if they aren’t already installed.
- Copy the provided script and save it as a .ps1 file on your computer (e.g., myscriptsso.ps1).
- From the PowerShell terminal, navigate to the folder where you saved the script.
- Run the script using the usage example provided.
- In vScope, go to Settings > SSO and enable Azure SSO.
- Paste the Tenant ID, Client ID (App ID), and Client Secret into the corresponding fields.
- Copy the Callback URL from vScope and paste it into your running script.
- The script will log you into Azure and grant admin consent for the necessary delegated permissions.
- Confirm that the application registration has been successfully created in Azure.
Usage example:
.\myscriptsso.ps1 -DisplayName "vScope SSO" -GenerateClientSecret
Optional paramter: -RbacScope "/subscriptions/subscription-id"
PowerShell script:
param(  [Parameter(Mandatory=$true)]  [string]$DisplayName,  [switch]$GenerateClientSecret,  [string]$RbacScope = $null,  [string]$AzRoleDefinitionName = "Reader")
# --------------------------------------------------------# Step 1: Connect to Microsoft Graph# --------------------------------------------------------
Write-Host "Connecting to Microsoft Graph..." -ForegroundColor Cyantry {    $scopes = @(        "Application.ReadWrite.All",        "AppRoleAssignment.ReadWrite.All"    )    Connect-MgGraph -Scopes $scopes -ErrorAction Stop    Write-Host "Successfully connected to Microsoft Graph" -ForegroundColor Green} catch {    Write-Host "Error connecting to Microsoft Graph: $($_.Exception.Message)" -ForegroundColor Red    Write-Host "Please ensure you have the right permissions and can access the tenant." -ForegroundColor Yellow    exit 1}
# --------------------------------------------------------# Step 2: Create the Application and Service Principal# --------------------------------------------------------
Write-Host "Creating application '$DisplayName'..." -ForegroundColor Cyan$app = New-MgApplication -DisplayName $DisplayName `    -RequiredResourceAccess @{        ResourceAppId = "00000003-0000-0000-c000-000000000000"  # Microsoft Graph        ResourceAccess = @(            @{                Id = "e1fe6dd8-ba31-4d61-89e7-88639da4683d"  # User.Read                Type = "Scope"            },            @{                Id = "37f7f235-527c-4136-accd-4a02d197296e"  # openid                Type = "Scope"            },            @{                Id = "64a6cdd6-aab1-4aaf-94b8-3cc8405e90d0"  # email                Type = "Scope"            }        )    }$sp  = New-MgServicePrincipal -AppId $app.AppIdWrite-Host "App created. AppId: $($app.AppId)" -ForegroundColor Green
# --------------------------------------------------------# Step 3: Generate Client Secret (Optional)# --------------------------------------------------------
$secretValue = $nullif ($GenerateClientSecret.IsPresent) {  Write-Host "Creating client secret (shown once)..." -ForegroundColor Yellow  $pwd = Add-MgApplicationPassword -ApplicationId $app.Id -PasswordCredential @{ displayName = "client-secret" }  $secretValue = $pwd.SecretText}
# --------------------------------------------------------# Step 4: Define and Grant Application Permissions# --------------------------------------------------------
function Get-ResourceSp {  param([string]$WellKnownAppId, [string]$FallbackDisplayName)  $spn = $null  if ($WellKnownAppId) { $spn = Get-MgServicePrincipal -Filter "appId eq '$WellKnownAppId'" }  if (-not $spn -and $FallbackDisplayName) { $spn = Get-MgServicePrincipal -Filter "displayName eq '$FallbackDisplayName'" }  return $spn}$graphSp = Get-ResourceSp -WellKnownAppId "00000003-0000-0000-c000-000000000000" -FallbackDisplayName "Microsoft Graph"if (-not $graphSp) { throw "Could not find Microsoft Graph service principal in this tenant." }$defenderSp = Get-ResourceSp -WellKnownAppId $null -FallbackDisplayName "WindowsDefenderATP"if (-not $defenderSp) { Write-Warning "WindowsDefenderATP service principal not found. The Defender permissions step will be skipped."; $DefenderAppPermissions = @() }

function Grant-AppRole {  param(    [Microsoft.Graph.PowerShell.Models.MicrosoftGraphServicePrincipal]$ResourceSp,    [string]$RoleValue  )  $role = $ResourceSp.AppRoles | Where-Object { $_.Value -eq $RoleValue -and $_.AllowedMemberTypes -contains "Application" -and $_.IsEnabled }  if (-not $role) { throw "App role '$RoleValue' not found on resource '$($ResourceSp.DisplayName)'." }  New-MgServicePrincipalAppRoleAssignedTo -ServicePrincipalId $sp.Id -BodyParameter @{    principalId = $sp.Id    resourceId  = $ResourceSp.Id    appRoleId   = $role.Id  } | Out-Null  Write-Host "Granted application permission '$RoleValue' on '$($ResourceSp.DisplayName)'." -ForegroundColor Green}Write-Host "Granting Microsoft Graph application permissions..." -ForegroundColor Cyanforeach ($perm in $GraphAppPermissions) { Grant-AppRole -ResourceSp $graphSp -RoleValue $perm }if ($DefenderAppPermissions.Count -gt 0) {  Write-Host "Granting Defender for Endpoint application permissions..." -ForegroundColor Cyan  foreach ($perm in $DefenderAppPermissions) { Grant-AppRole -ResourceSp $defenderSp -RoleValue $perm }}
# --------------------------------------------------------# Step 5: Assign Azure RBAC Role (Optional)# --------------------------------------------------------
if ($RbacScope) {  Write-Host "Assigning Azure RBAC role '$AzRoleDefinitionName' at scope $RbacScope ..." -ForegroundColor Cyan  try {    try { Get-AzContext | Out-Null } catch { Connect-AzAccount | Out-Null }    New-AzRoleAssignment -ObjectId $sp.Id -RoleDefinitionName $AzRoleDefinitionName -Scope $RbacScope | Out-Null    Write-Host "Azure RBAC role assigned." -ForegroundColor Green  } catch {    Write-Warning "Failed to assign Azure RBAC role. Assign later in Portal > Access control (IAM). Error: $($_.Exception.Message)"  }}
# --------------------------------------------------------# Step 6: Initial Configuration Summary# --------------------------------------------------------
$summary = [pscustomobject]@{    TenantId            = (Get-MgContext).TenantId    ApplicationName     = $app.DisplayName    ApplicationId       = $app.AppId    ServicePrincipalId  = $sp.Id    ClientSecret        = $secretValue    RedirectUri        = $null    NextSteps           = "Use TenantId, ApplicationId (ClientId) and ClientSecret (or cert) in vScope's Azure RM credential. SSO is configured with email claims."}
Write-Host "`nInitial configuration complete. Use these details to configure vScope:" -ForegroundColor Yellow$summary | Format-List
# --------------------------------------------------------# Step 7: Configure Callback URL# --------------------------------------------------------
Write-Host "`nPlease configure vScope with the above details and obtain the callback URL." -ForegroundColor CyanWrite-Host "Once you have the callback URL from vScope, paste it below." -ForegroundColor Cyan$RedirectUri = Read-Host "Enter the callback URL from vScope"

if (-not $RedirectUri.StartsWith("http")) {    throw "Invalid callback URL. Must start with http:// or https://"}
# --------------------------------------------------------# Step 8: Configure Authentication and Claims# --------------------------------------------------------
Write-Host "`nConfiguring web platform and authentication settings..." -ForegroundColor Cyan$spa = @{    RedirectUris = @($RedirectUri)}$web = @{    RedirectUris = @($RedirectUri)    ImplicitGrantSettings = @{        EnableIdTokenIssuance = $true        EnableAccessTokenIssuance = $false    }}

Update-MgApplication -ApplicationId $app.Id -Spa $null -Web $web

Update-MgApplication -ApplicationId $app.Id `    -RequiredResourceAccess @{        ResourceAppId = "00000003-0000-0000-c000-000000000000"  # Microsoft Graph        ResourceAccess = @(            @{                Id = "e1fe6dd8-ba31-4d61-89e7-88639da4683d"  # User.Read                Type = "Scope"            },            @{                Id = "37f7f235-527c-4136-accd-4a02d197296e"  # openid                Type = "Scope"            },            @{                Id = "64a6cdd6-aab1-4aaf-94b8-3cc8405e90d0"  # email                Type = "Scope"            }        )    }

$optionalClaims = @{    IdToken = @(        @{            Name = "email"            Source = $null            Essential = $false            AdditionalProperties = @()        }    )}
$groupClaims = @{    SecurityGroups = $true    DirectoryRoleTypes = "All"}
Write-Host "`nConfiguring groups claim for token..." -ForegroundColor CyanUpdate-MgApplication -ApplicationId $app.Id `    -OptionalClaims $optionalClaims `    -GroupMembershipClaims "SecurityGroup"
Write-Host "Groups claim configuration added successfully." -ForegroundColor Green
Write-Host "Authentication platform configured successfully." -ForegroundColor Green
# --------------------------------------------------------# Step 9: Final Summary and Admin Consent# --------------------------------------------------------
$summary.RedirectUri = $RedirectUriWrite-Host "`nFinal configuration complete:" -ForegroundColor Green$summary | Format-List
$ConsentUrl = "https://login.microsoftonline.com/$((Get-MgContext).TenantId)/adminconsent?client_id=$($app.AppId)"Write-Host "`nTo grant admin consent for delegated permissions, please open the following URL in a browser (with a Global Admin account):" -ForegroundColor YellowWrite-Host $ConsentUrl -ForegroundColor Cyan

Start-Process $ConsentUrl
Group & Permission Mapping
Section titled “Group & Permission Mapping”To use Microsoft Entra ID for managing groups and permissions in vScope, configure group settings.
-
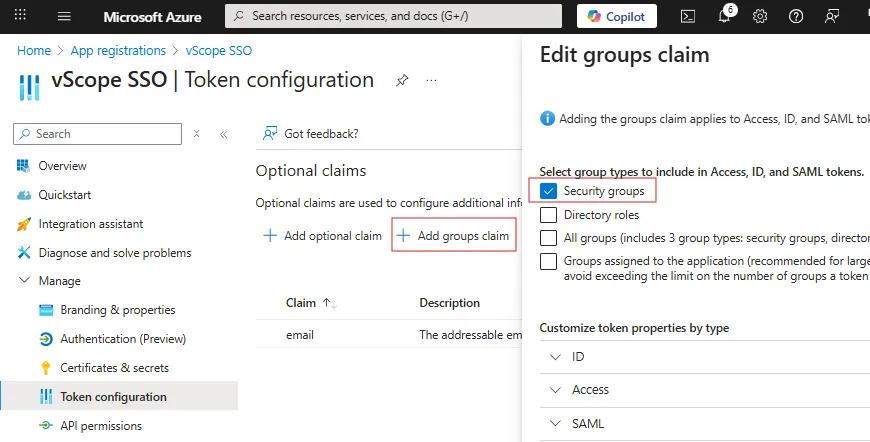
In the app registration, go to Manage > Token Configuration and + Add groups claim.
-
Edit groups claim to match your group mapping. If you plan to map users to groups in vScope by their security groups or directory roles, ensure that you select them here.
-
Under Customize token properties by type, ensure that Group ID is selected for ID and Access.
Learn more about group claims on Microsoft Docs.
-
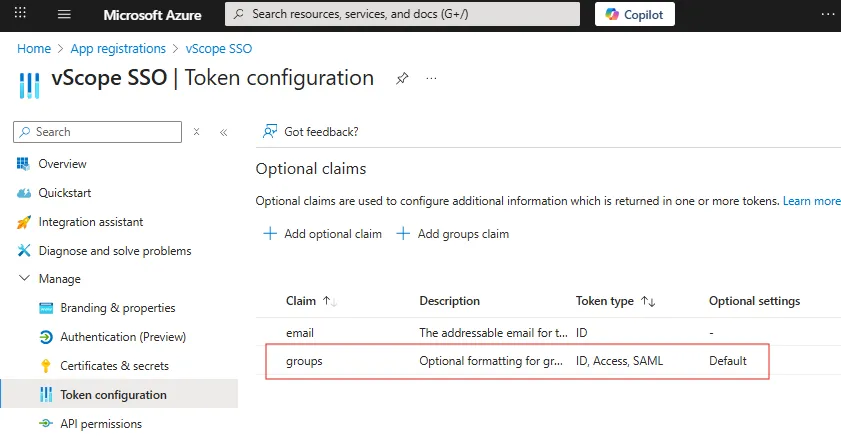
You should now see groups under Manage > Token configuration > Optional Claims
Back to vScope…
- In Settings > SSO select Enable Group mapping
- Select Property in Azure: Choose the Azure property (e.g., group ID) to base your mapping on.
- Name the Mapping: Enter a name for your mapping to help you identify it in vScope, e.g. Service Desk
- Enter Azure Object ID: Provide the object ID of the user/group in Azure. You can find the group ID in Azure.
- Preview and Add Mapping: Review your mapping settings, then click Add.
Group mapping will apply upon next user login.
Troubleshooting
Section titled “Troubleshooting”Wrong username, password or authentication method. Try again or contact your administrator.
Section titled “Wrong username, password or authentication method. Try again or contact your administrator.”This is a generic error that can relate to anything from configuration to permissions.
-
If the user exists in vScope:
- Ensure that you have set Authentication to SSO.
-
If the user does not exist in vScope:
- Ensure that the accounts have a registered email (same as user principal name) in Microsoft Entra ID.
-
If the user does not exist in vScope
- Ensure that the user account is in the correct tenant in Microsoft Entra ID
- Ensure that the accounts have permissions to login to vScope (e.g. via Group Mapping) or that it has a registered email in Microsoft Entra ID.
Group Mapping not working
Section titled “Group Mapping not working”- Learn more at SSO Group Mapping not working
IDP reports error: AADSTS700054
Section titled “IDP reports error: AADSTS700054”This error indicates that an id token is not available in the authorization response.
- If Authorization Code Flow is not checked in the vScope SSO configuration.
- Ensure that ID tokens is checked in Microsoft Entra ID under Manage > Authentication > Settings.
IDP reports error: error_description =[AADSTS700054: response_type 'id_token' is not enabled for the application.Trace ID: 7c07bd28-6e16-436e-aa4a-41c34b6c8500 Correlation ID: 167a88f0-c3c3-47f9-8ba1-23423423234Timestamp: 2025-05-22 12:06:27Z]error_uri =[https://login.microsoftonline.com/error?code=700054]state =[234234234]