Custom SQL
This guide will walk you through integrating vScope with an SQL database to inventory assets, using a sample case to display asset costs. This method is adaptable to various asset types and multiple tags.
What you can do with Custom SQL?
- Create new assets
- Add Tags and enrich information about existing assets
- Merge instances
- Mark assets as removed
Asset Types Requirements
Section titled “Asset Types Requirements”To ensure data quality and that data gets added to the correct asset(s), there are a couple of requirements to create a unique identifier for an asset, e.g. Asset Serial Number.
Basic Requirements
Section titled “Basic Requirements”- All Identifier values must be UTF-8 and single value.
- Asset Serial Numbers must always be unique in the database.
| Asset Type | Required Identifiers | Additional Rules | Matching Rules |
|---|---|---|---|
| All Machines | • Name • At least one of: • Asset Serial Number • Domain | • Length of Name + Asset Serial Number + Domain ≥ 5 characters • Name + Domain must be unique in the database | • Match on Name + Domain • Match on Name + Asset Serial Number • Do not match if Asset Serial Number differs |
| Access Points | • Name • Asset Serial Number | • Length of Name + Asset Serial Number ≥ 5 | Not Available |
| Display Devices | • Name • At least one of: • Asset Serial Number • Device ID | • Length of Name + Asset Serial Number + Device ID ≥ 5 • Device ID must be unique in the database | • Match on Asset Serial Number or Device ID • If multiple matches on Asset Serial Number, attempt to match on Device ID • If multiple matches on Device ID, attempt to match on Asset Serial Number |
| Firewalls | • Name • Asset Serial Number | • Length of Name + Asset Serial Number ≥ 5 | • If multiple matches on Asset Serial Number, attempt to match on Name |
| Load Balancers | • Name • Asset Serial Number | • Length of Name + Asset Serial Number ≥ 5 | • If multiple matches on Asset Serial Number, attempt to match on Name |
| Mobile Devices | • Name • At least one of: • Asset Serial Number • IMEI | • Length of Name + Asset Serial Number + IMEI ≥ 5 • IMEI must be unique in the database | • Match only on Asset Serial Number if IMEI is empty • Match only on Asset Serial Number if IMEI matches |
| Routers | • Name • Asset Serial Number | • Length of Name + Asset Serial Number ≥ 5 | • If multiple matches on Asset Serial Number, attempt to match on Name |
| Switches | • Name • Asset Serial Number | • Length of Name + Asset Serial Number ≥ 5 | Not Available |
| User Accounts | • Name • At least one of: • Domain | • Length of Name + Email + Domain > 5 • Name + Domain must be unique in the database • Email must be unique in the database | • Match on Name + Domain or Email • If multiple matches, attempt to match on Name + Domain + Email |
Video: Getting Started with Custom SQL
Section titled “Video: Getting Started with Custom SQL”Steps to Set Up Custom SQL
Section titled “Steps to Set Up Custom SQL”- Ensure vScope has access to the SQL database and required credentials.
- Check the SQL table: Identify necessary columns and expected values.
- Write and preview the SQL query before pasting it into vScope.
- Add the query to vScope and initiate a discovery.
- Review results in vScope.
- Configure tags in Tags.
1. Access & Credentials
Section titled “1. Access & Credentials”First, confirm that the vScope server can access the SQL database. Different SQL databases use various default ports:
- MySQL: 3306
- Microsoft SQL: 1433
Configure the connection under Advanced Settings when adding credentials for Custom SQL. Ensure the account has read permissions.
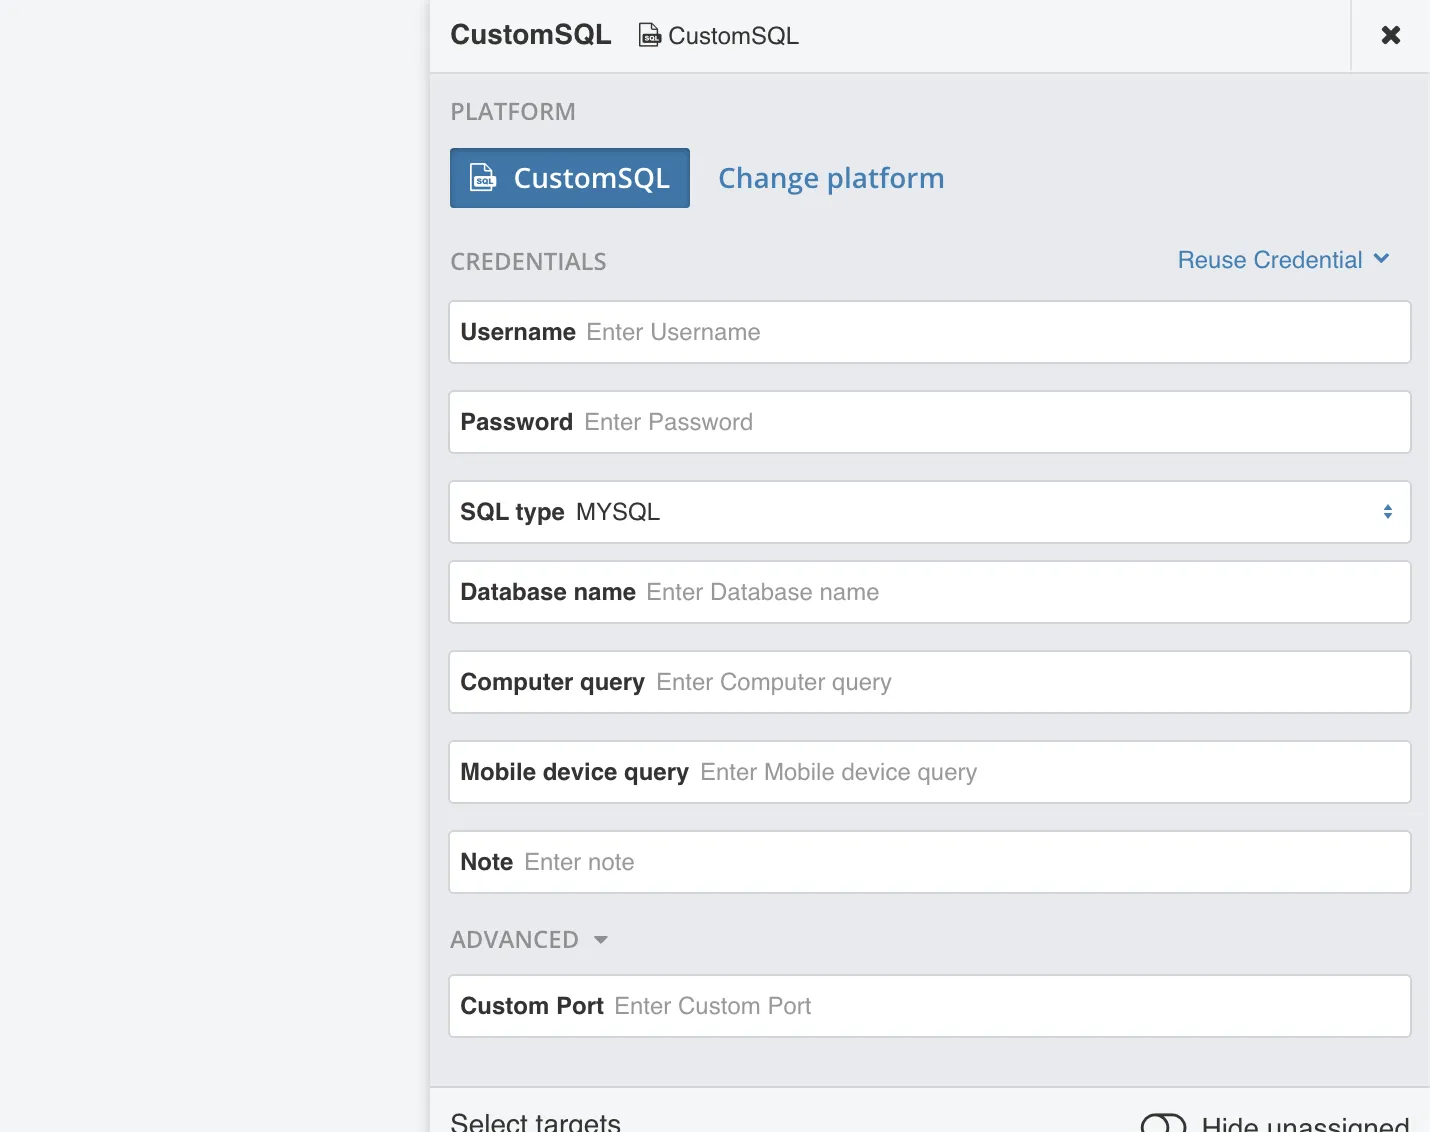
To add Custom SQL credentials, go to Discovery Manager > Credentials > + Credential > Custom SQL and input the following:
- Username
- Password
- SQL Type
- Database Name
- Query (specific to asset type)
- Note (optional)
- Custom Port (optional)
2. Check the SQL Table in Data Source
Section titled “2. Check the SQL Table in Data Source”In this example, we’re adding assets from a MySQL database. Reviewing the table:

Notice that the Serial Number column must be renamed to Asset Serial Number to allow vScope to match assets. Additionally, filter out non-computer assets like iPhone.
3. Writing the SQL Query
Section titled “3. Writing the SQL Query”Starting with a basic query, adjust it to select relevant columns and match criteria:
SELECT * FROM `asset_table`Refine to include only necessary columns:
SELECT `Name`, `Domain`, `Serial Number` AS `Asset Serial Number`, `Total Cost` FROM `asset_table`Preview the output to ensure it matches the expected format.
4. Inventory the SQL Database
Section titled “4. Inventory the SQL Database”In vScope, paste the SQL query into the Computer Query field. To verify the setup, click the lightning icon next to the field. This will test the connection and ensure that the query format is correct. If the test is successful, initiate a discovery by clicking Rediscover for the Custom SQL credential.
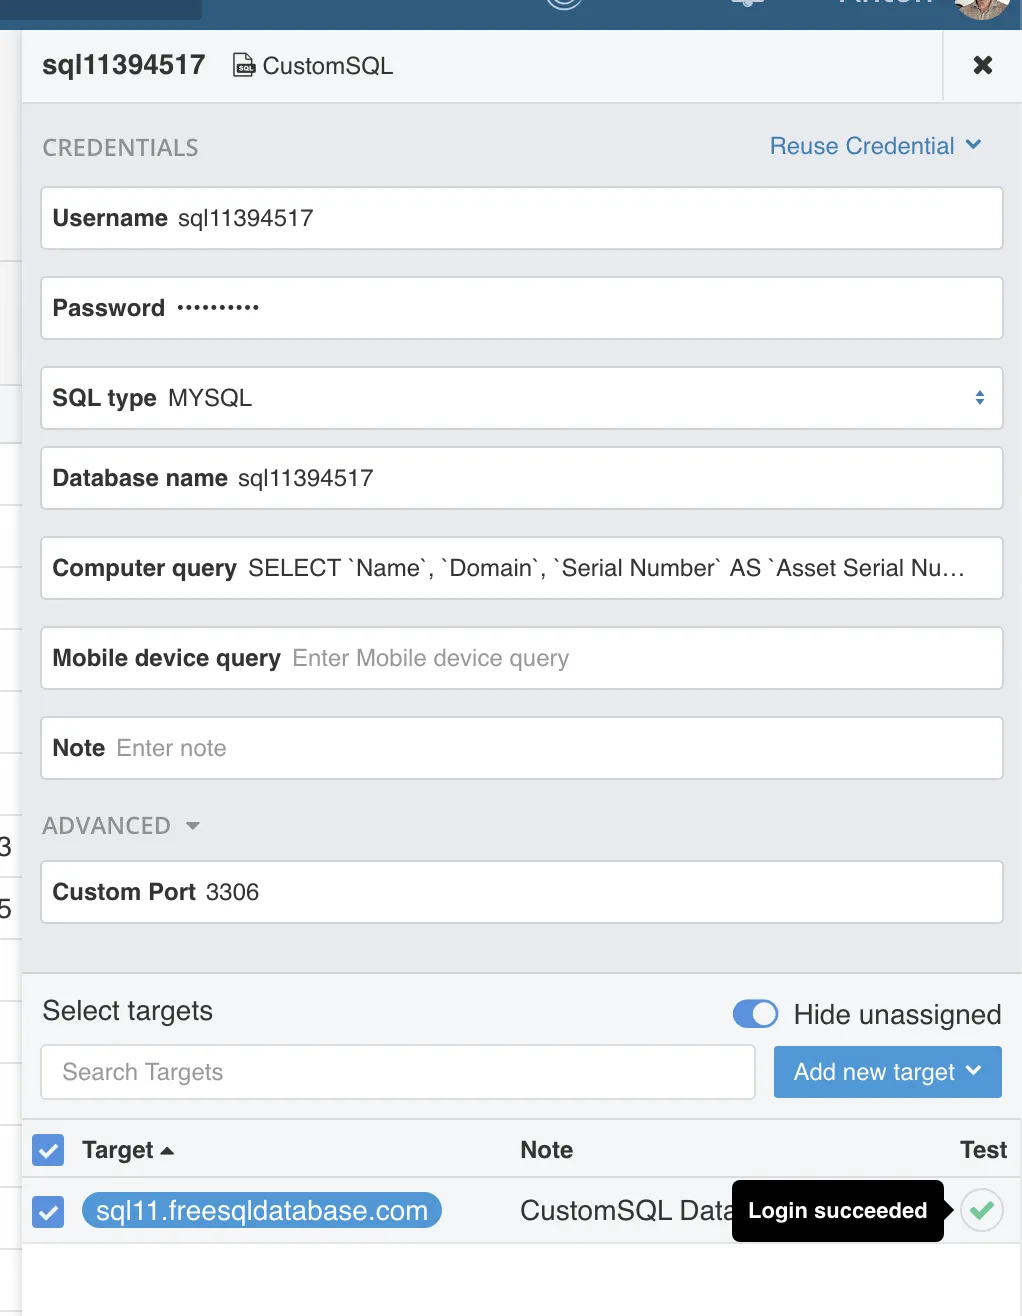
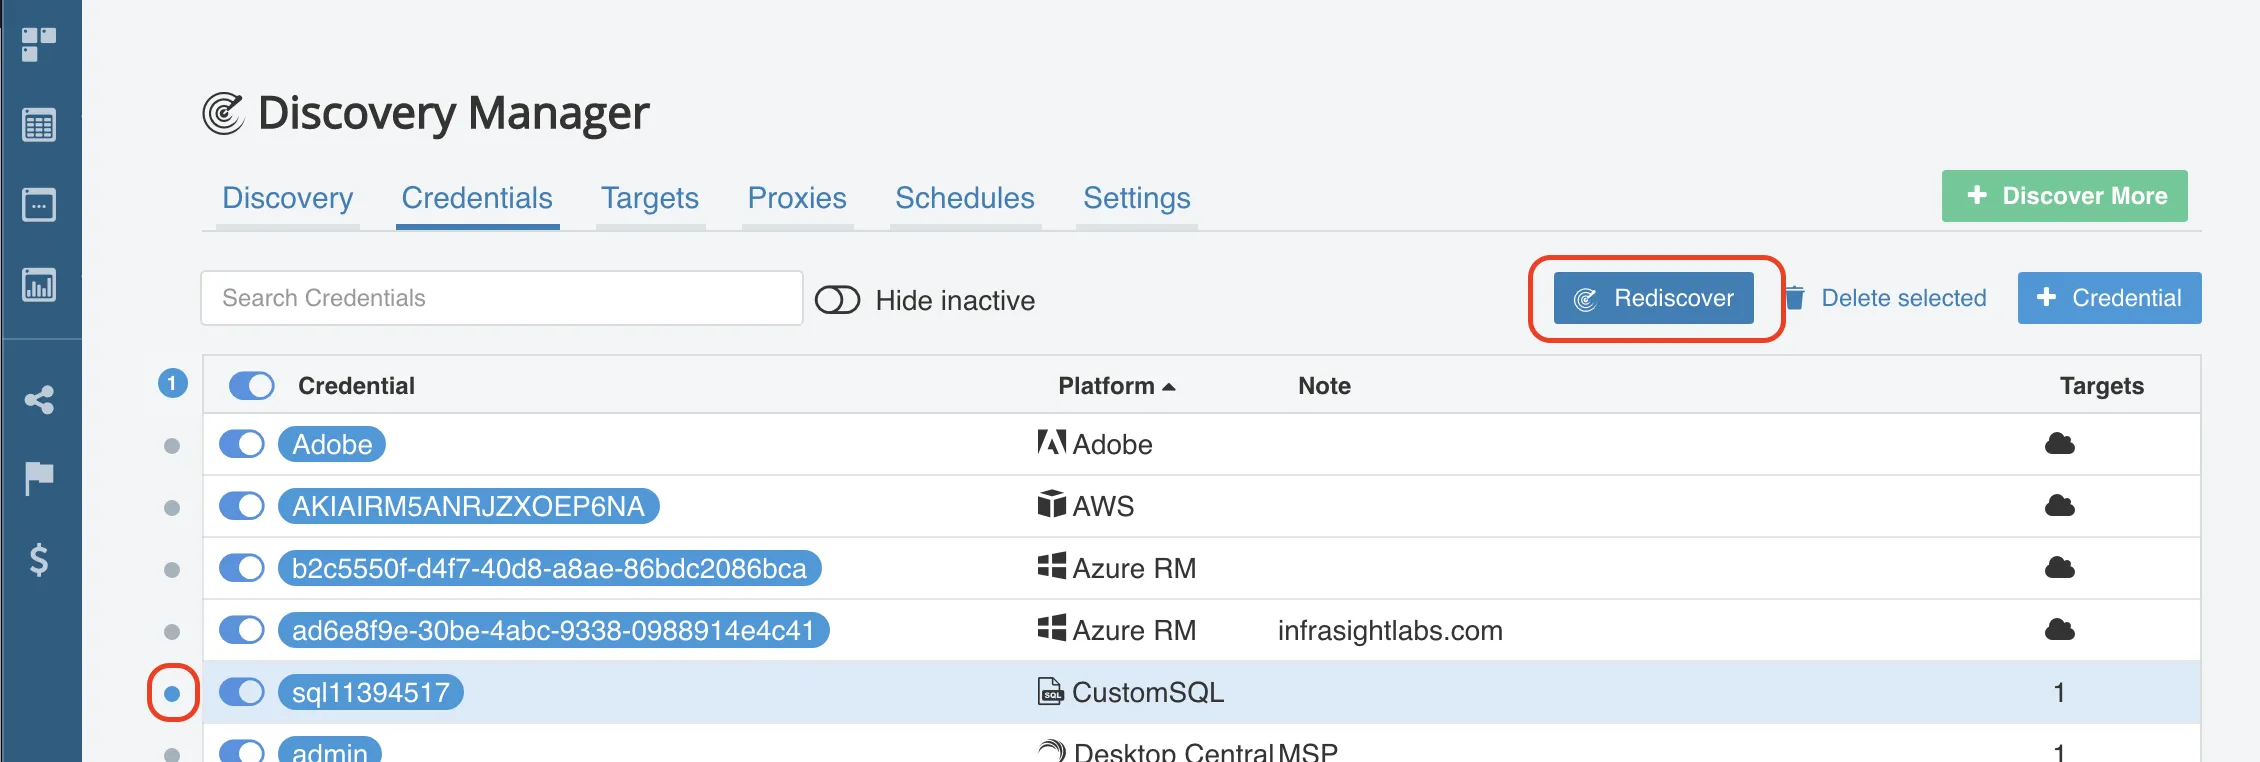
If everything looks correct, you can check the Log History tab in Discovery Manager to review the details of each step, including any success or error messages from the discovery process.
5. Viewing the Results
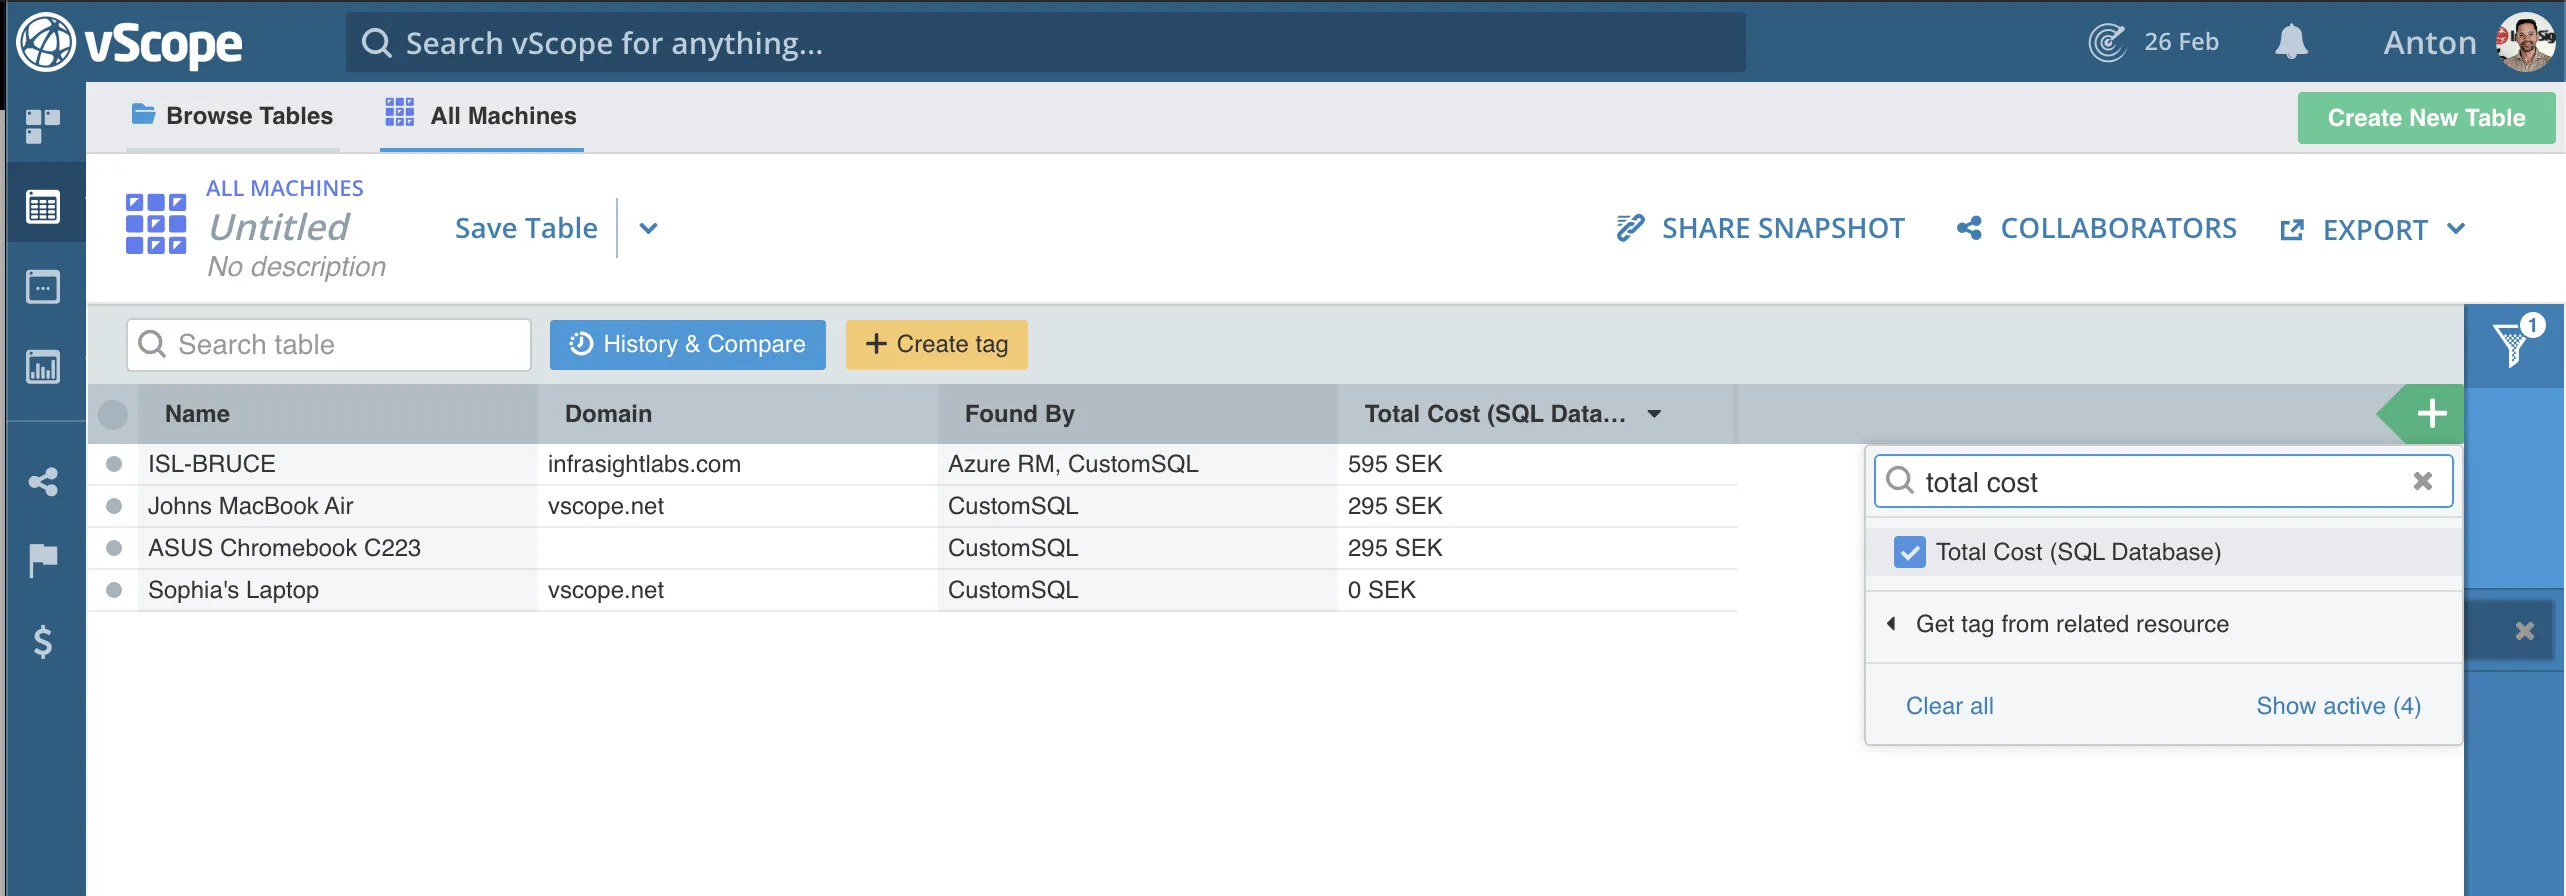
Section titled “5. Viewing the Results”Since we’re adding Computer assets, create a table in Tables to list All Machines. Apply a filter to show only assets Found By: Custom SQL to isolate the newly added data.

You may notice that some assets appear as new, while others merge with existing records. For instance, assets with matching Asset Serial Numbers and Domain will be merged with pre-existing records, while unmatched records will be added as new assets.
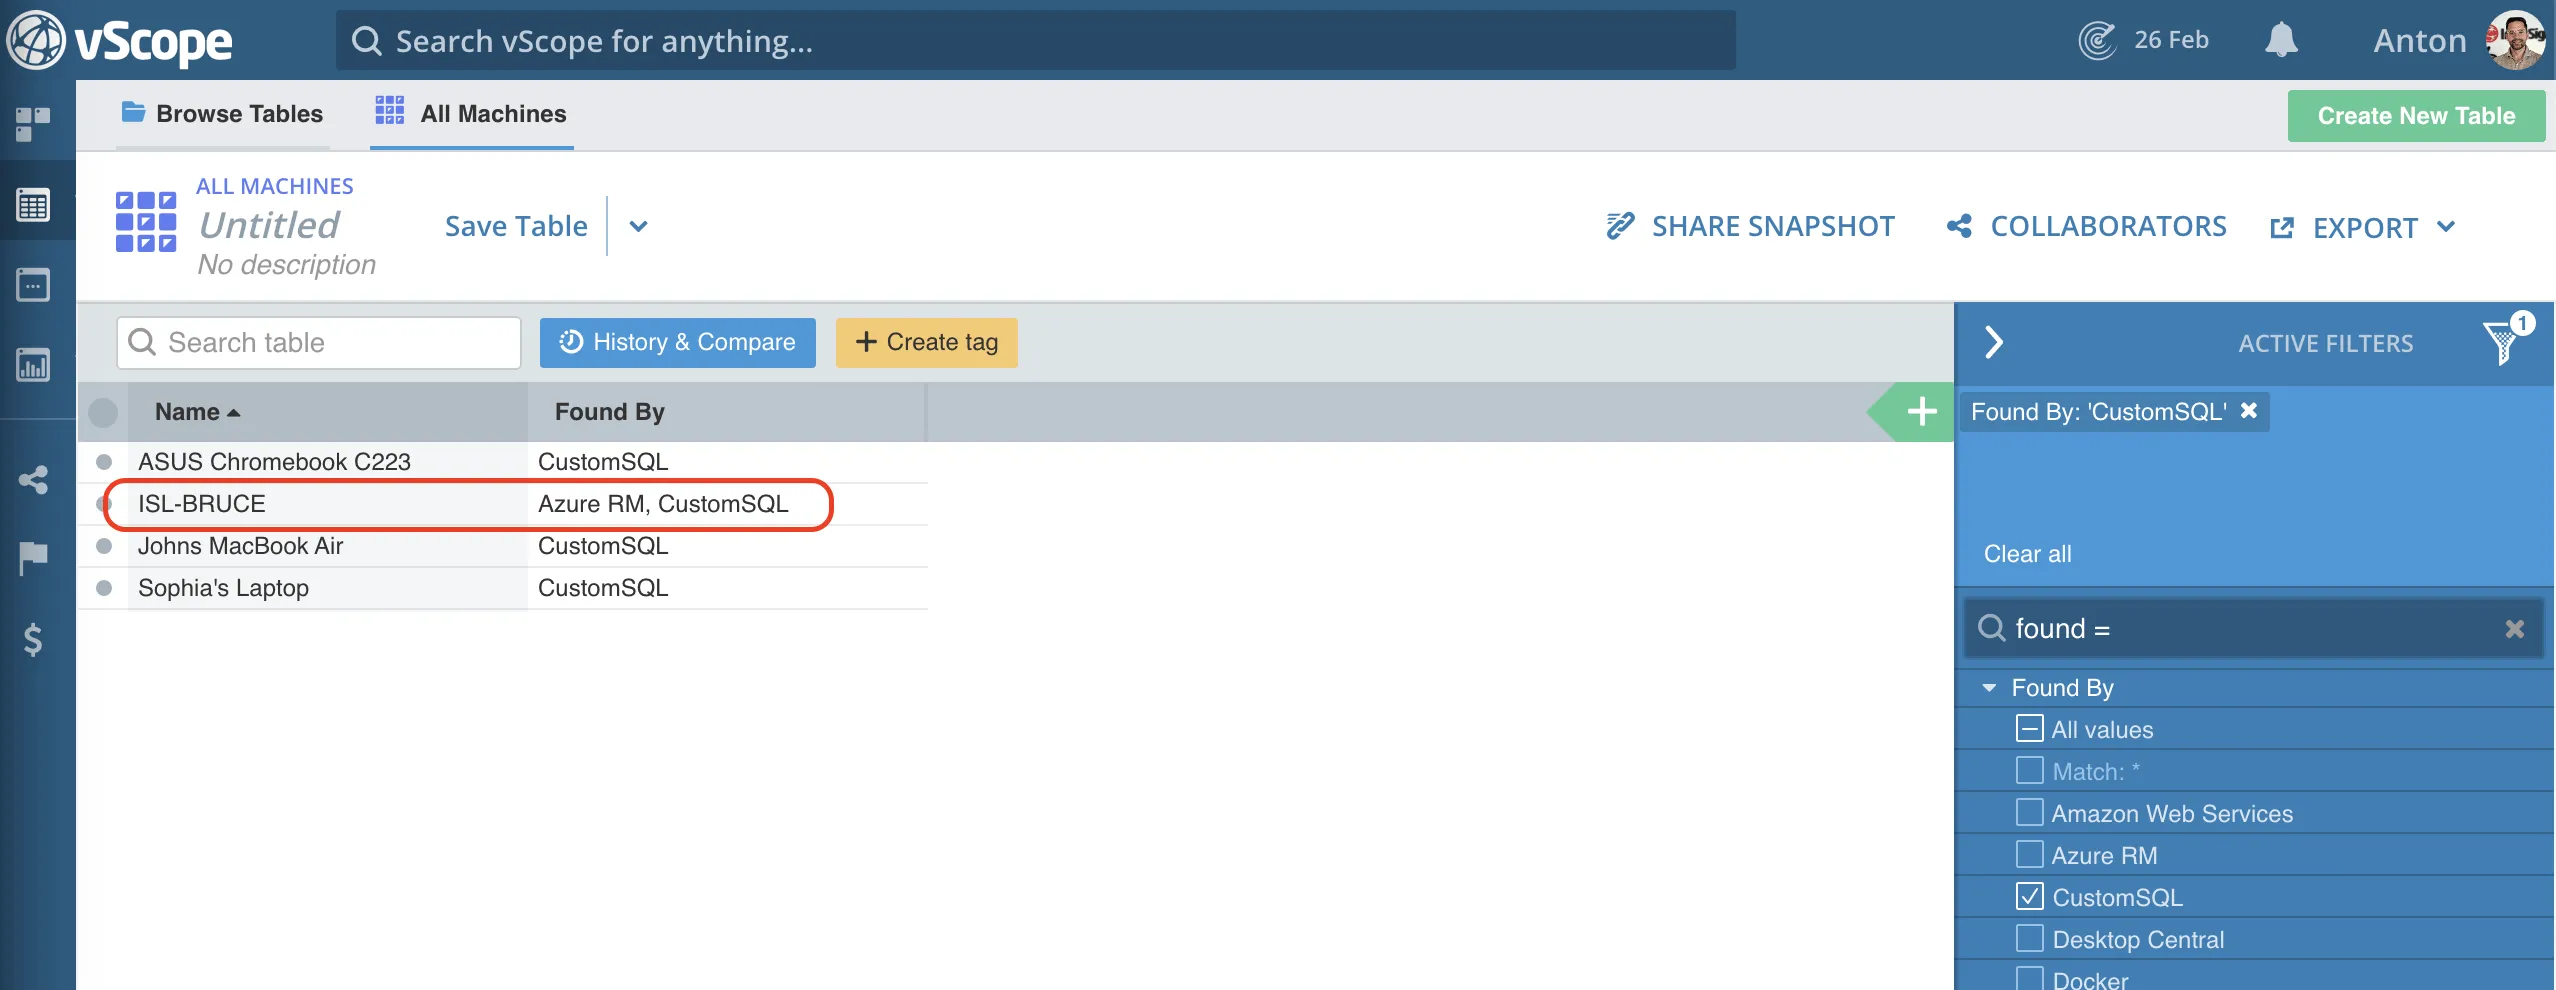
If an asset is missing a Domain or Asset Serial Number, it won’t be stitched with existing records, as these fields are required to confirm a match.
6. Fetching Values to a Tag in vScope
Section titled “6. Fetching Values to a Tag in vScope”With the SQL database connection established, you can now configure vScope to continuously fetch specific values from the SQL database and add them as tags, using Tags from Discovery
- Navigate to Tags.
- Go to Created from Discovery and click + Create Tag.
- Select Custom SQL as the source and choose All Machines as the asset type.
Give the new tag a meaningful name, such as Total Cost (SQL Database), to clarify that the values are fetched from an external SQL database.
- From the Value from dropdown, select the SQL column that corresponds to the data you want to retrieve, in this case, Total Cost.
- Set the Format to Number and define the Unit as SEK.
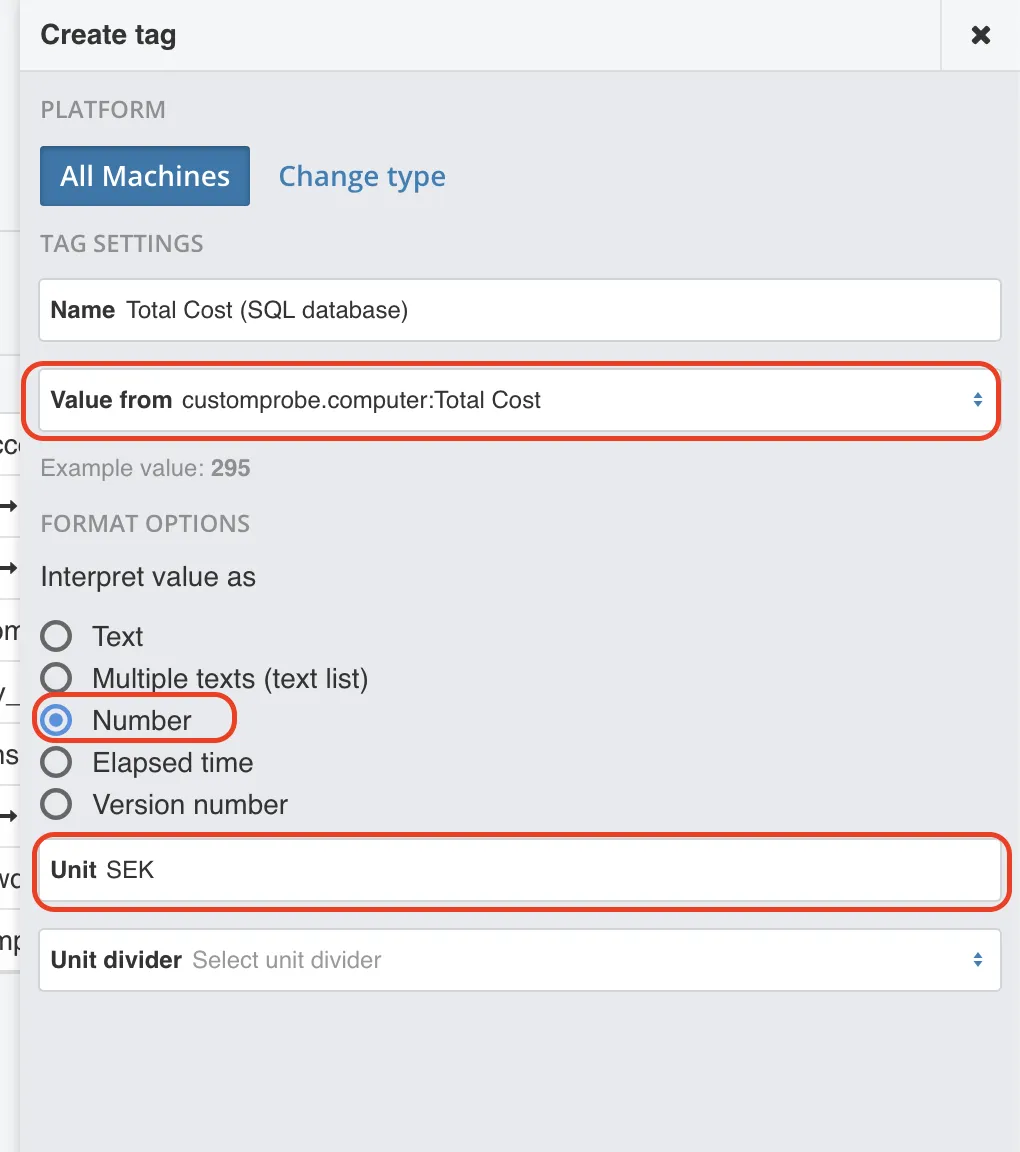
Click Create Tag to finalize, and then rediscover the Custom SQL credential to populate the tag. Now, in Tables, add the Total Cost (SQL Database) column to your table to view the values.
