Incorporating Windows PowerShell into your Discovery enhances vScope’s ability to collect information from the operating systems of Windows servers or clients. Using PowerShell, instead of WMI/WinRM, allows for a more flexible inventory, including the capability to customize the collection of Windows Registry Keys. Furthermore, PowerShell enables the use of Microsoft’s Just Enough Administration for more efficient permission management in your environment.
As of 30 January 2024, the recommended approach is to use WMI as the primary method for collecting bulk information from Windows operating systems, with Windows PowerShell serving as a complementary method. This combination not only extends the tag collection but also facilitates the use of Just Enough Administration.
Adding Windows OS (PowerShell)
Notice: Administrator privileges are required to add Windows OS to vScope.
- Go to Discovery > Credentials.
- Click Create Credential, and select Windows (PowerShell).
- Configure your Integration Settings by adding the credential details. You can reuse an existing credential, or create a new one from scratch.
- Select the target to be discovered by this credential and click Create.
Good job! You have now configured Windows OS inventory using PowerShell.
Collect registry keys from Windows OS
With PowerShell, you can collect additional values from the operating system, specifically from the Windows Registry, by configuring the keys in your credentials and creating tags from Discovery.
- Go to your Windows (PowerShell) credential in Discovery > Credentials.
- Under Advanced Settings, enter a registry key that you want to collect from your Windows assets.
eg. HKEY_LOCAL_MACHINE\SYSTEM\ControlSet001\Control\TimeZoneInformation
vScope will automatically collect all nested subkeys from the configured key. - Click Add and then Update to save your changes.
- Run a Discovery, and go to Tags > Created from discovery.
- Click Create tag and select Windows > All Machines.
- Configure your tag by entering a name and selecting the key you want to collect the value from. You can choose to format the value.
- Click Create and rerun a Discovery (Discovery > Credentials > Select Windows (PowerShell) and Rediscovery
Congratulations, vScope will now collect your configured registry key(s) for every Windows OS discovered with your Windows PowerShell credential!
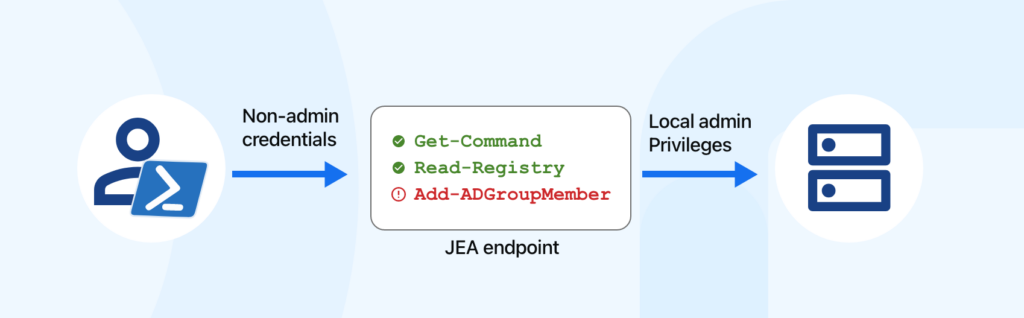
Configuring Just Enough Administration (JEA)
Prerequisites
- The vScope Server and target server must be part of a Windows domain.
- The JEA credentials with non-administrator rights must be domain-level credentials.
- PowerShell 5.0 or Windows Management Framework 5.1 must be installed on the target Windows machines.
- PowerShell Remoting must be enabled on the target Windows machines.
Read More
Role Capabilities
We need to create a Role Capabilities file which specifies what a role is allowed to do. To create a new one you may do:
New-PSRoleCapabilityFile -Path .\vScopeJEA.psrc
Edit the file and add cmdlets and providers that vScope need access to. Example file where the user is allowed to execute Get-WmiObject, ConvertTo-Xml, ConvertTo-JSON, Get-Command, Get-Variable, Get-Item, Get-ChildItem, Get-ItemProperty and has access to the Windows Registry.
@{
# Version number of the schema used for this document
SchemaVersion = '2.0.0.0'
# ID used to uniquely identify this document
GUID = 'f2f7a741-0e5c-46dc-8805-17cda3df1c5b'

# Author of this document
Author = 'Administrator'

# Session type defaults to apply for this session configuration. Can be 'RestrictedRemoteServer' (recommended), 'Empty', or 'Default'
SessionType = 'RestrictedRemoteServer'

# Cmdlets to allow specific functions
VisibleCmdlets = @(
'ConvertTo-Xml',
'ConvertTo-JSON',
'Get-ChildItem',
'Get-Command',
'Get-Item',
'Get-ItemProperty'
'Get-Variable',
'Get-WmiObject',
    'Microsoft.PowerShell.Utility\\Select-Object',

    # Service Management
    'Get-Service',

    # IIS-specific Cmdlets for fetching applications, bindings and virtual directories
'Get-WebApplication',
'Get-WebBinding',
    'Get-WebVirtualDirectory'
)

# Custom functions visible
VisibleFunctions = @('Get-IslSecurityDescriptor', 'Get-IslEnumDefinition')

# Custom function definitions
FunctionDefinitions = @(
    @{
        Name = 'Get-IslSecurityDescriptor'
        ScriptBlock = {
            param([Parameter(ValueFromPipeline=$true)]$SecuritySetting)

            if ($SecuritySetting) {
                $SecuritySetting.GetSecurityDescriptor().Descriptor
            }
        }
    },
    @{
        Name = 'Get-IslEnumDefinition'
        ScriptBlock = {
            param([string]$EnumName)

            if ($EnumName) {
                [Enum]::GetValues($EnumName) | Microsoft.PowerShell.Utility\\Select-Object @{
                    n = "Name"; e = { $_ }
                }, @{ n = "Value"; e = { $_.value__ } }
            }
        }
    }
)


VisibleProviders = @('IIS','Variable','Certificate','Registry')

# Modules needed in the session
ModulesToImport = @('WebAdministration')

# Whether to run this session configuration as the machine's (virtual) administrator account
RunAsVirtualAccount = $true

# User roles (security groups), and the role capabilities that should be applied to them when applied to a session
RoleDefinitions = @{
    'ISL\\WMIUSER' = @{
        'RoleCapabilities' = 'vScopeJEA' }
}
}
Before PowerShell 6.0 the role capabilities file must be placed in the RoleCapabilities folder within a module. This creates a PowerShell Module called vScopeJEA and places it in C:\Program Files\WindowsPowerShell\Modules\vScopeJEA:
# Create a folder for the module (C:\Program Files\WindowsPowerShell\Modules\vScopeJEA)
$modulePath = Join-Path $env:ProgramFiles "WindowsPowerShell\Modules\vScopeJEA"
New-Item -ItemType Directory -Path $modulePath

# Create an empty script module and module manifest
# At least one file in the module folder must have the same name as the folder itself
$rootModulePath = Join-Path $modulePath "vScopeJEAFunctions.psm1"
$moduleManifestPath = Join-Path $modulePath "vScopeJEA.psd1"
New-Item -ItemType File -Path $RootModulePath
New-ModuleManifest -Path $moduleManifestPath -RootModule "vScopeJEAFunctions.psm1"

# Create the RoleCapabilities folder (C:\Program Files\WindowsPowerShell\Modules\vScopeJEA\RoleCapabilities) and copy in the PSRC file
$rcFolder = Join-Path $modulePath "RoleCapabilities"
New-Item -ItemType Directory $rcFolder
Copy-Item -Path .\vScopeJEA.psrc -Destination $rcFolder
Create Session Configuration
Next, we need to create a session configuration which will configure a PowerShell endpoint. Here we assign the user ISL\vscopeuser the role capabilities vScopeJEA which we defined earlier. RunAsVirtualAccount is set to true which means that the (allowed) commands will be run as a local administrator. RestrictedRemoteServer means that the shell is very restricted and only a few core commands are allowed. The config is saved to vScopeJEA.pssc and then tested with Test-PSSessionConfigurationFile.
$roles = @{
    'ISL\VSCOPEUSER'    = @{ RoleCapabilities = 'vScopeJEA' }
}

$parameters = @{
    SessionType = 'RestrictedRemoteServer'
    Path = '.\vScopeJEA.pssc'
    RunAsVirtualAccount = $true
    RoleDefinitions = $roles
}
New-PSSessionConfigurationFile @parameters
Test-PSSessionConfigurationFile -Path .\vScopeJEA.pssc # should yield True
If you choose you utilize the TranscriptDirectory setting in the session configuration, please note that this setting will log all commands run by vScope and their output. This folder will grow very fast and without bounds so make sure you monitor this behaviour.
Register Session Configuration
To register the session configuration and create an endpoint we need to use Register-PSSessionConfiguration and specify the name of the endpoint. Here we name it vScopeScan.
Register-PSSessionConfiguration -Path .\vScopeJEA.pssc -Name 'vScopeScan' -Force
List Session Configurations
Get-PSSessionConfiguration
This should result in a list of session configurations where vScopeScan is part of that list:
Name          : microsoft.powershell
PSVersion     : 5.1
StartupScript :
RunAsUser     :
Permission    : NT AUTHORITY\INTERACTIVE AccessAllowed, BUILTIN\Administrators AccessAllowed, BUILTIN\Remote Management
                 Users AccessAllowed

Name          : vScopeScan
PSVersion     : 5.1
StartupScript :
RunAsUser     :
Permission    : ISL\VSCOPEUSER AccessAllowed
Connect To The Endpoint
From a remote computer, connect to the computer where JEA was configured:
$securePassword = ConvertTo-SecureString -AsPlainText -Force <password>
$cred = New-Object System.Management.Automation.PSCredential("<username>", $securePassword)
Enter-PSSession -computername ComputerXYZ -Credential $cred -ConfigurationName 'vScopeScan'
Verify that access is allowed to Get-WmiObject and ConvertTo-Xml by executing which should output the main computer system object as XML:
[ComputerXYZ]: PS>Get-WmiObject Win32_ComputerSystem | ConvertTo-Xml -As String
<?xml version="1.0" encoding="utf-8"?>
<Objects>
.....
Deployment
Microsoft recommends deploying JEA endpoints in environments using PowerShell DSC (Desired State Configuration). Samples and documentation here:
https://github.com/PowerShell/JEA
Information about PowerShell DSC:
https://learn.microsoft.com/en-us/powershell/scripting/dsc/overview?view=powershell-7.4